Changelog
2025/06/08: Changed the NPM setup process, so it is shorter and more secure; note: this post needs work.
2025/08/16: I completely reworked this post. Hosting OpenProject now has its own post. I added more security stuff.

Motivation for this Post
If the cover image looks familiar, you’ve guessed the vibe: red pill (closed systems) or blue pill (open source). This guide gently nudges you toward the blue one, and shows how to run your own services without needing to be a sysadmin.
Back in 2022, while preparing my first PhD study, I hit a wall. The plan hinged on an older in-house Java app that… no longer worked. With a deadline looming and no dev background beyond some R, I hacked together a Shiny app. Great - until I had to put it online. That “wait, what is a server?” moment pulled me into self-hosting.
I’m glad it did. A single practical need became a broader, affordable toolkit. For ~5-10 € per month (plus ~1 € for a domain), you can rent a VPS with enough power and storage for a surprising amount of work, and keep control of your data.
Why bother?
Tired of clunky software that barely meets your needs, shoves AI in your face, and collects your data?
Don’t love uploading passport scans to random websites?
Sick of begging your admin to change a setting?
Want to save on subscriptions and learn something useful along the way?
Prefer supporting responsible, transparent tech?
Once you’ve deployed one service, you’ll start asking “What else can I host?” Quite a lot (some examples):
OpenProject: Plan and track serious projects.
Nextcloud: Files, calendar, contacts, collaborative docs, even calls.
Quarto website: Publish an academic site or blog straight from R/Python projects.
LLM interfaces: Bring your own models and providers behind one interface.
Photo libraries: Immich or PhotoPrism for AI-assisted, private photo management.
Document organizers: Paperless-ngx to organize PDFs; Stirling-PDF to edit them.
Home dashboards: Home Assistant or Dashy for smart devices and quick links.
Survey tools: Run your own study stack with formr.
The trade-off is time. Self-hosting can be time-consuming, especially if you need to compile information from twenty different sources. This guide aims to get you from zero to a reasonably secure VPS while explaining what’s happening so you can make informed choices.
What We’ll Cover
Here’s what we’ll do:
Renting Your Virtual Server: Pick an affordable cloud server and get it running.
Choosing and Securing Your Domain: Your domain is your digital identity. We’ll walk through how to pick one and set it up.
Basic Server Configuration: I’ll guide you through setting up your new server and logging in for the first time.
Installation of a Reverse Proxy: Install Docker and set up Nginx Proxy Manager to route and secure web traffic.
Tighten Security: Harden your SSH access, add CrowdSec for automated protection, and apply essential security headers.
Ready? Let’s get to it!
Step 1: Get Your Server
This is your starting point: you’re on a local machine, connected to the internet, and you want to serve content (a website, an app) to anyone with a browser. You need a server!

A server is just a computer that’s set up to serve requests. You could repurpose an old laptop at home, but renting a slice of a professionally managed machine is simpler and far more reliable: no hardware failures to worry about, no consumer-grade upload bottlenecks, and no dealing with your ISP. (Curious about home servers later? This video is a good primer).
Most providers sell “virtual private servers” (VPS). You pay for a portion of CPU, RAM, and storage on their hardware. Pay more → get more resources.
For typical personal/academic use, entry tiers are plenty. For example, I run multiple services comfortably on a VPS with 4 vCPU, 8 GB RAM, and ~80 GB SSD. My decision criteria were:
Price: Cheaper than stacking SaaS subscriptions.
Server Location: EU hosting (GDPR), ideally geographically close for lower latency.
User-Friendly Setup: Clean control panel, good docs, and flexibility (e.g., bring-your-own domain/DNS).
I use Hetzner (Germany) because it checks these boxes and is affordable. EU servers are powered by renewable energy, and locations include Germany, Finland, Singapore, and the USA. There are many alternatives such as OVHcloud. If you want to try Hetzner, here’s my affiliate link (disclosure): https://hetzner.cloud/?r ef=RaxVIDGl8nmz. You get €20 credit; if you later spend real money, I get €10 in credits.
Institutions sometimes sponsor VPS access (e.g., in Baden-Württemberg, Germany, bwCloud). Any provider will work with what follows.
1.1: A Concrete Plan (Hetzner Example)
I chose the CX22 plan and enabled automatic backups (adds 20% to the price). Backups let you roll back in one click, a great safety net. You can enable/disable anytime.
Create an account and go to the Cloud Console → Add server. You’ll see something like this:
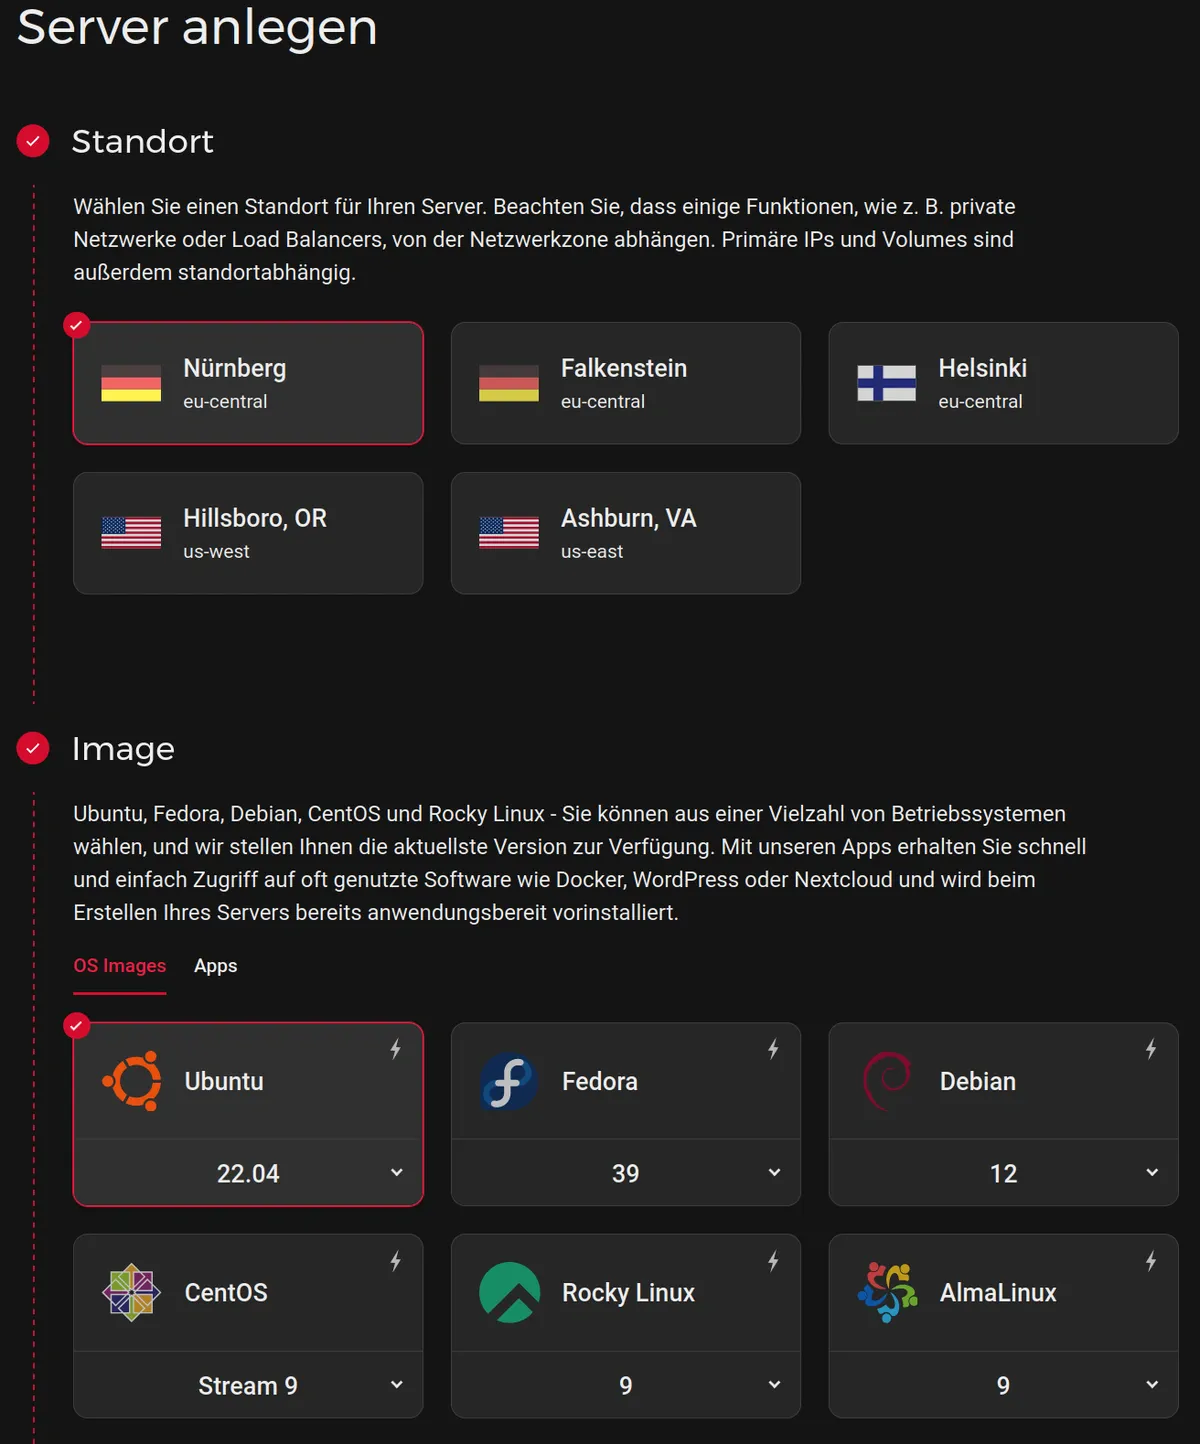
Location: pick the closest region for better latency.
Operating system: choose Ubuntu (24.04 LTS). It’s popular, well-documented, and what this guide targets.
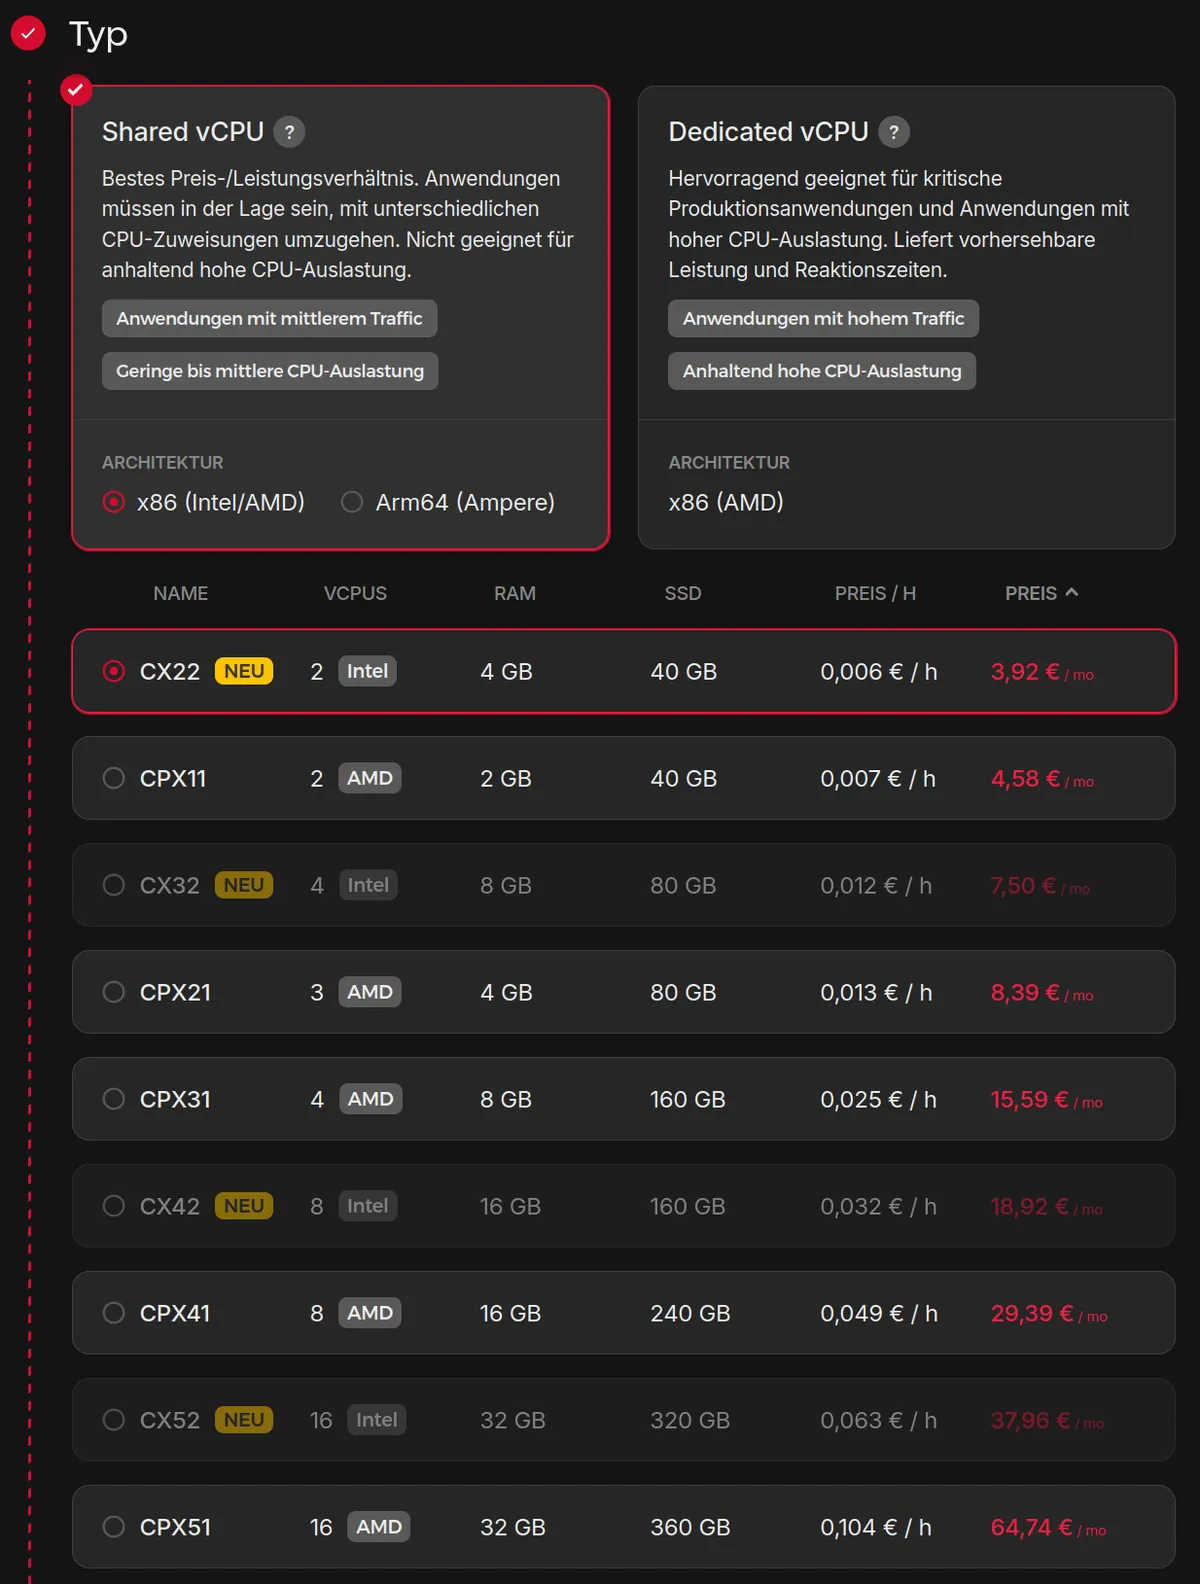
CPU architecture/type: choose x86_64 (Intel/AMD), fewest compatibility surprises. Arm64 (Ampere/AArch64) is efficient and increasingly common, and many Docker images support it, but some binaries are x86-only. If you’re new to this and there’s no clear price/performance win, x86_64 is the safe default.
Plan/size: pick CX22 (or similar “2–4 vCPU / 4–8 GB RAM” tier). AMD vs. Intel is fine either way.
Networking: enable IPv4 (in addition to IPv6). IPv6 is newer and works perfectly fine, but it requires more effort. For example, it is not enabled by default on Ubuntu Server, and many settings must be configured twice (once for IPv4 and once for IPv6). For beginners and typical use cases, using only IPv4 is sufficient. That’s what we’ll do.
1.1.1: Use SSH Keys (Not Passwords)
At some point, we have to log in to our server. You can let Hetzner send you the root password of your server via email and subsequently use their interface to log in, or establish a remote connection from the terminal of your local machine via SSH (Secure Shell).
While using a password is technically an option, SSH keys are strongly recommended for enhanced security. They are a pair of cryptographic keys for authenticating in the SSH protocol. One is a private key, which you keep confidential on your local machine, and the other is a public key that you store on the server.
SSH keys are favored over passwords as they offer superior security, being almost immune to brute force attacks. Additionally, they don’t require manual entry each time (but you can set an additional password to further enhance security).
For Linux and Mac users, generating an SSH key pair is straightforward. Open your terminal (search for “terminal” in your system if you’re unsure where to find it), and type in:
ssh-keygen -t ed25519- 1
- This command creates a strong ed25519 key pair. You will be asked for a filename (just click enter for the default), and if you want to add a keyphrase (password). If you choose to do so, you will have to enter it each time you use SSH. It is a good idea if others have access to your local machine.
You’ll find the public SSH key in ~/.ssh/id_ed25519.pub. Open this file, and copy its entire content. In Hetzner’s interface, click on “Add SSH Key” and paste the content from your public SSH key file. Give it a recognizable name.
Windows users can utilize the Windows Subsystem for Linux (WSL) to perform the same steps.
If you need more comprehensive instructions, DigitalOcean has an excellent guide covering SSH keys for all operating systems.
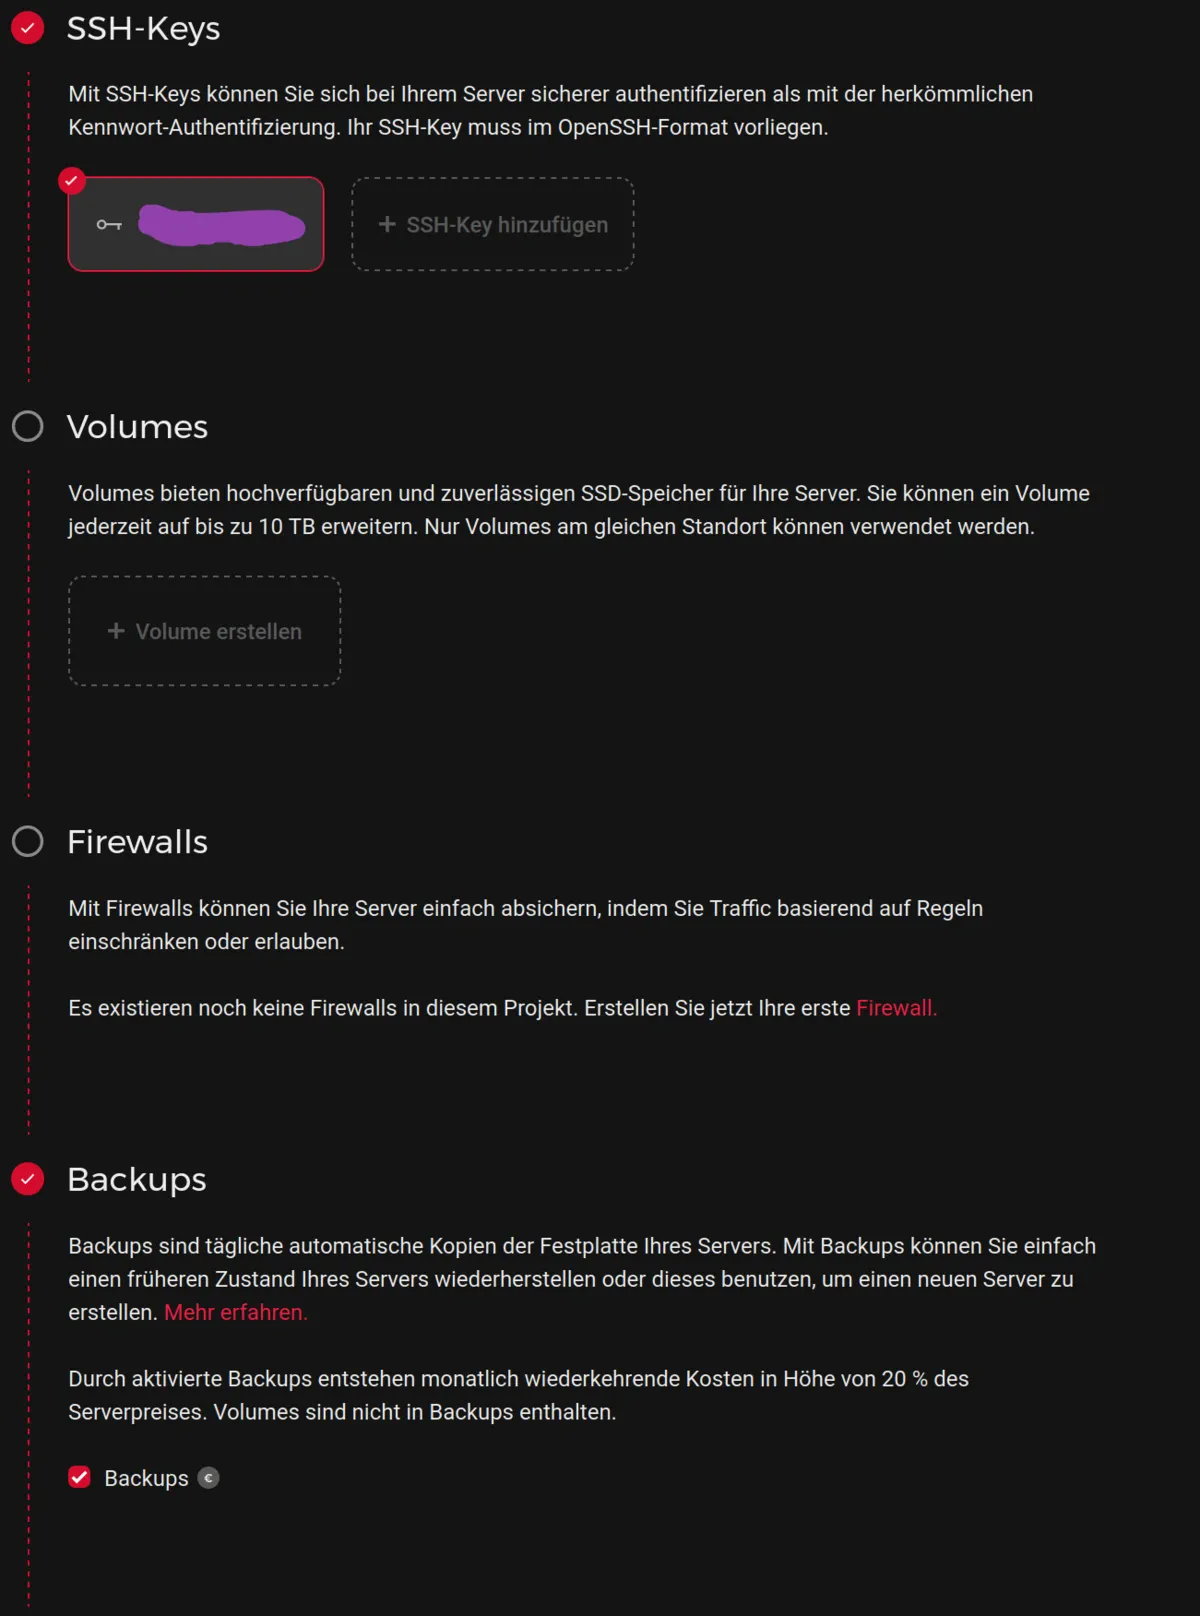
Storage / volumes: the default disk (e.g., 40–80 GB) is enough to start; you can attach volumes later.
Provider firewall: optional. We’ll configure our own firewall on the server shortly.
Backups: highly recommended.
Name your server: anything memorable.
VPS billing is typically hourly with a monthly cap. For example, if you destroy (not just stop) the server after ~14 days, you pay roughly half the monthly price.
Step 1 brought you this far:

With the server online, the next step is to get a domain and wire up DNS so people can reach it.
Step 2: Get Your Domain
Every internet-connected device has an Internet Protocol (IP) address (e.g., 203.0.113.145), which works like a postal address. This is where a domain comes in handy – it links a readable, memorable string (like https://dgerdesmann.de) to your server’s IP address. Without a domain, users would have to navigate to URLs like https://203.0.113.145:8080, which are not only unattractive but also appear less trustworthy.
Once you’ve acquired a domain, you can create unlimited subdomains. For example:
https://blog.yourdomain.com (blog)
https://coolapp.yourdomain.com (app)
https://portfolio.yourdomain.com (portfolio)
If you want to learn more about domains, Mozilla has a nice overview.
Like VPS providers, separate companies sell domain registration and host DNS (Domain Name System, i.e. the system that maps domain names to IPs). You can often keep everything under one roof or split it up (register at Provider A, use DNS at Provider B). Either is fine. You can change domain registrars at any time and take your domains with you, but you cannot transfer the remaining time on your domain.
You can find appealing domains for well under 1 € per month. Before picking a registrar, pick a name. Tips:
Short and clear: Easy to spell, easy to say.
Long-term relevance: Avoid names tied to a narrow project if your focus might change.
Choose the right extension: .com, .net, and country extensions like .de are familiar and widely trusted; .eu is handy for EU-wide identity. Super-cheap or obscure extensions sometimes trigger spam filters, which is fine for experiments, less great for public sites.
Personal branding: Using your name is natural for academics. Shorten long names if needed (dgerdesmann.de vs danielgerdesmann.de). If your name is common like Schmidt, Smith or Singh, add a distinguisher (e.g., yourname-biostatistician.com).
To check availability and compare prices, try Domcomp or visit popular registrars like Namecheap directly. I registered my domain with Namecheap, so some screenshots below reference their UI. (Hetzner also offers domain registration and Hetzner DNS; keeping your VPS and domain in one account is convenient, but not required.)
Namecheap also offers these additional features:
For our purposes, the add-ons aren’t essential. I did not purchase “SSL” because we’ll use Let’s Encrypt for free TLS certificates later.
Tip: A domain is useful beyond web hosting: many mail providers let you bring your own domain for custom email addresses (e.g., yourname@yourdomain.com). Here’s a Tuta guide: Using your own domain for email (details vary by provider; Gmail/Google Workspace may require paid plans).
With your server and domain ready, we’re set to start tinkering.
Step 3: Basic Server Setup
Step 3.1: User and Firewall Configuration
Time to prep the VPS for the apps we’ll run. I’ll assume you set up SSH keys as recommended (otherwise use the console from your provider’s interface).
3.1.1: SSH Login
Connect from your local machine. Enter the following command in your terminal:
ssh root@your_server_ip- 1
- Replace “your_server_ip” with the VPS IP shown in your dashboard.
You’re now in a shell (Bash). A few handy Bash shortcuts:
Paste:
Ctrl+Shift+V.Move to the beginning of the line with
Ctrl+A, and to the end withCtrl+E.Delete characters to the left of the cursor using
Ctrl+W. To delete characters to the right of the cursor, useCtrl+U.Use the up and down arrows to navigate through your command history. Search history with
Ctrl+R.Repeat the last command:
!!+Enter.Comment code with
#.
Most importantly: Be mindful when running commands, especially those that modify or delete files. That’s sometimes permanent. It’s a good idea to save your commands in a .txt file on your local system for future reference and troubleshooting.
3.1.2: Creating a User
Once logged in as “root”, it’s safer to create a new user, give it admin privileges, and operate from that account. You can choose any name you like. To add a user, use:
adduser username- 1
- Use any username you like, but keep it short as you will need to type it in sometimes. You will be prompted for user information. Click enter to leave that empty.
Then, grant this user admin privileges:
usermod -aG sudo username- 1
- Command breakdown: usermod = command itself; -a = add user to a group; -G sudo = add user to “super user do” group (admin privileges).
(Recommended:) Copy your SSH key to the new account so you can log in as that user:
rsync --archive --chown=username:username ~/.ssh /home/systemusername- 1
- Replace “username” with the username you chose above. Replace the path to the SSH keys with the actual path on your system. Command breakdown: rsync = tool for remote file synchronization; –archive = tell rsync that it should preserve attributes of files (permissions, timestamps …); –chown=username:username = sets the (group and user) ownership of the copied files to the specified user. The rest of the command is the path to the directory where the .ssh keys are stored on your system.
You’re still logged in as root. Switch to your new user:
su - username- 1
- From now on, if you ever get “permission denied” errors, use “sudo” in front of the command to run it with admin privileges.
3.1.3: Enable and Configure a Basic Firewall (UFW)
We’ll configure a basic firewall to restrict external traffic to specific ports. A port is like a gate for web traffic. We want to open gates so that users can reach our website, for example, from anywhere. But we want to open as few gates as possible, so as to provide as little surface area as possible for attacks.
First, allow SSH connections for future remote logins:
sudo ufw allow 22/tcp- 1
- Command breakdown: ufw = “Uncomplicated Firewall” command line tool to configure the iptables firewall in linux; allow = what it says; 22/tcp = the standard Open-SSH port is 22, “tcp” stands for Transmission Control Protocol. We use this protocol because of its reliability. Another protocol is UDP, which is less reliable but has a lower latency (used for streaming media, for example). Simply typing “ufw allow 22” will enable both protocols.
Allow HTTP (Hypertext Transfer Protocol) and HTTPS (HTTP Secure) connections. These are protocols used for transmitting data over the internet, typically webpages. HTTPS encrypts the data to provide secure communication. We’ll primarily use HTTPS for security, but HTTP is needed during the setup phase:
sudo ufw allow 80/tcp- 1
- Port 80 is the standard port for http.
sudo ufw allow 443/tcp- 1
- Port 443 is the standard port for https.
One more port we need to open (temporarily):
sudo ufw allow 81/tcp- 1
- Port 81 is used by the Nginx Proxy Manager were are going to setup later. We need to open this port, so we can reach its interface in the browser.
Enable the firewall and check its status:
sudo ufw enable- 1
- We set the rules for our firewall, now we need to activate it.
sudo ufw status- 1
- Gives you a breakdown of the status. If the firewall is active, incoming traffic is only allowed on the ports we specified. Incoming traffic means e.g. access from your browser.
You may notice that each rule you defined is listed twice: once for IPv4 and once for IPv6. If you don’t need IPv6, it’s best to disable it.
sudo nano /etc/default/ufw- 1
- Opens the UFW config, which defines some default behavior.
Find the line that says IPv6 = yes and change it to no. Then, restart UFW:
sudo ufw reloadThe UFW status should now only list IPv4 rules.
3.1.4: Server Updates
Finally, update your server’s software, including security patches. Refresh the list of available packages:
sudo apt update- 1
- Command breakdown: sudo = run a command with admin privileges; apt = Advanced Package Tool, a package management command-line tool; update = a subcommand of apt that gets information about the latest packages and updates available.
Then, install any updates:
sudo apt upgrade- 1
- “upgrade” checks the information from “update” against the installed package versions. If newer versions are available, you will be asked if you want to install them. Confirm with “y”. If there is a prompt about which services to restart, just press enter.
Sometimes a critical component, such as the kernel, was upgraded. It’s a good idea to reboot now.
sudo reboot- 1
- This will log you out. Ensure that you know how to log back in (ssh username@server-ip + password if you set it up). If you’re stuck, you can use your provider’s console.
That’s it for the foundational setup: regular user with sudo, firewall in place, and a fully updated system. We’ll tighten SSH and other security settings in the dedicated security section.
Step 3.2: Directing Your Domain to the Server IP
With your domain in hand, it’s time to link it to your server. Navigate to your domain provider’s website, such as Namecheap, and log into your account. Once you’re in, follow these steps:
Accessing Domain Settings: On the dashboard, locate and click on the “Domain List” in the left panel. Find your purchased domain and click on the “MANAGE” button next to it.
Setting Up DNS Records: Head over to the “Advanced DNS” section. Here, we’ll create an A-record to connect your domain to the server’s IP address.
Click on “Add New Record” under the Host Records section.
Select “A Record” from the dropdown menu.
For the Host field, you can choose any string. We’ll use
nproxy. This means your admin interface will be available at http://nproxy.yourdomain.com.In the Value field, enter your server’s IP address.
Leave the “TTL” (Time To Live) setting on automatic.
Activating the Record: After confirming these details, Namecheap will register the connection between “nproxy.yourdomain.com” and your server’s IP in a DNS internet database. DNS changes typically propagate within minutes (sometimes up to ~30–60 min, depending on TTL and caching).
Need images with these instructions? Namescheap has a tutorial.
Step 3.3: Installing Docker
Finally, we’re ready to install some exciting software on our server. Our aim is to host multiple applications, like an OpenProject instance, a Nextcloud instance, and a personal webpage. To manage these efficiently and securely, we’ll use containerization, a method where each application is isolated in its own container(s) with all necessary components (code, libraries, settings, etc.). This keeps services from stepping on each other and makes upgrades and rollbacks easier. For this purpose, we’ll use the popular container technology Docker.
3.3.1: Preparing for Docker Installation (where to get it from)
sudo apt install ca-certificates curlsudo install -m 0755 -d /etc/apt/keyringssudo curl -fsSL https://download.docker.com/linux/ubuntu/gpg -o /etc/apt/keyrings/docker.asc- 1
- Command breakdown: curl -fsSL = curl make the https request for you, fsSL specifies that you don’t generally want error messages or show progress, only if the download fails, and that curl should follow redirection if necessary; https://download.docker […] = URL where the GPG key is stored that verifies the authenticity of Docker packages; | = pipe symbol, like |> in R or %>% in tidyverse; the rest of the command converts the GPG key to text and stores it, so you can use it to verify Docker packages in the future.
sudo chmod a+r /etc/apt/keyrings/docker.ascecho \
"deb [arch=$(dpkg --print-architecture) signed-by=/etc/apt/keyrings/docker.asc] https://download.docker.com/linux/ubuntu \
$(. /etc/os-release && echo "$VERSION_CODENAME") stable" | \
sudo tee /etc/apt/sources.list.d/docker.list > /dev/null- 1
- In short, this command allows the APT package manager to recognize and use the Docker repository when installing or updating Docker packages.
sudo apt update- 1
- Refresh the package list again, now that you have added a repository. It fetches the latest Docker package versions.
3.3.2: Installing Docker
sudo apt-get install docker-ce docker-ce-cli containerd.io docker-buildx-plugin docker-compose-pluginsystemctl status docker- 1
- Shows detailed information about the Docker service, including whether it is running, how long it has been running, and its ID. You can also test if docker is running properly by entering: “sudo docker run hello-world”.
3.3.3: Adding User to Docker Group
To avoid needing root access every time you use Docker, add your user to the Docker group:
sudo usermod -aG docker ${USER}- 1
- This command adds the current logged-in user (fetched with the variable ${USER}) to the docker group.
su - ${USER}- 1
- Command breakdown: su = command to switch users, if you do not provide a username, it defaults to root; in conclusion, this command ensures you are logged-in as the user in the Docker group (you do not need to type in “sudo” every time).
groups- 1
- Shows you all existing groups, so you can check if your commands worked properly. There should be a “docker” group now.
Troubleshooting
Check for Updates: Ensure the Docker installation commands are current. Refer to the official Docker documentation for the latest installation steps on Ubuntu servers.
Further Learning: Digital Ocean offers an excellent guide on installing and using Docker. Additionally, the YouTube channel “Awesome Open Source” has a detailed video on using Docker in conjunction with the Nginx Proxy Manager, which we’ll set up next. You can find that here.
Alright! With these steps, you could containerize your applications and users could theoretically request them with your domain. However, there’s no application to serve yet:

Step 4: Setting Up Nginx Proxy Manager
After all the planning, purchasing, and setup, it’s time to see some tangible results: your first web UI running on your server. We’ll deploy Nginx Proxy Manager (NPM) to handle incoming web requests and route them to apps.
Nginx is a popular choice for home and web server applications because it’s lightweight, stable, and relatively simple to configure. It also acts as a reverse proxy, functioning as a gatekeeper that receives incoming requests and directs them to the appropriate server resources. This approach reduces security risks since we only need to open two ports (80 and 443) for users to reach this gatekeeper, rather than a separate port for each application.
Additionally, NPM simplifies the process of encrypting connections with HTTPS and implementing basic exploit protection. Good performance and solid security without needing to hand-write Nginx configs.
Let’s start the setup:
4.1: Creating a Working Directory
First, we’ll make a directory (“folder”) named “nproxy” for our installation and go there:
mkdir nproxy- 1
- mkdir = “make directory”, this is the command-line equivalent of right clicking and creating a folder on your system.
cd nproxy- 1
- cd = “change directory”, used to go to the directory you specify (so you can create, delete, and move files there).
4.2: Preparing the Configuration File
We’ll create a .yml file, which is essentially a recipe for our reverse proxy setup. If your server doesn’t have the text editor nano, install it with sudo apt install nano. Then, open a new file:
nano docker-compose.yml- 1
- Nano is a simple text editor. There are others, such as Vim. Nano is a good choice here because it is lightweight, relatively easy to use and we do not need any special features. .yml (YAML) files are used to configure data exchange between programs (or Docker containers). We use one here because the Nginx Proxy Manager is split into several Docker containers that need to communicate. YAML files are sensitive to indentation, so keep them exactly as you see them, or the file won’t do its job.
Copy and paste the following configuration into the file. You can check here, if it is still up to date.
services:
npm:
image: 'jc21/nginx-proxy-manager:latest'
restart: unless-stopped
ports:
- '80:80'
- '81:81'
- '443:443'
volumes:
- ./data:/data
- ./letsencrypt:/etc/letsencrypt
networks:
- npmnet
networks:
npmnet:
name: npmnet- 1
- We give the serivce a name: npm.
- 2
- Specifies that we want the latest Docker image of the proxy manager.
- 3
- Let the proxy manager containers run/restart until we explicitly stop them.
- 4
- These are the ports it uses. We have already opened them for incoming traffic, so you can access the proxy manager in your browser.
- 5
- Specifies directories where to store data, and SSL certificates.
- 6
- We attach the service to Docker network. Docker container can communicate over Docker networks. Nicely isolated with full control over which container can communicate.
- 7
- These lines specify that the network should be created on first start.
Make sure you get the indentation right. Save and exit nano (Ctrl+S to save, and Ctrl+X to exit).
4.3: Building from the Configuration
Use Docker Compose to build and deploy from this configuration:
docker compose up -d- 1
- This command creates and starts Nginx Proxy Manager in Docker containers as specified in the .yml file. The “-d” option will start the containers in the background, “detached” from the current session. If we type more commands in our terminal, it won’t affect the running containers (if we want to, say, stop the containers, we can use their ID).
Once the process completes, check the status of your containers:
docker ps- 1
- Shows details of all running containers. Should show “up” under STATUS. If you want to see a list of all containers, including stopped ones, add “-a” (all) to the command. There should be no stopped containers on your fresh server yet, so both commands should return the same list.
4.4: Accessing Your First Webpage
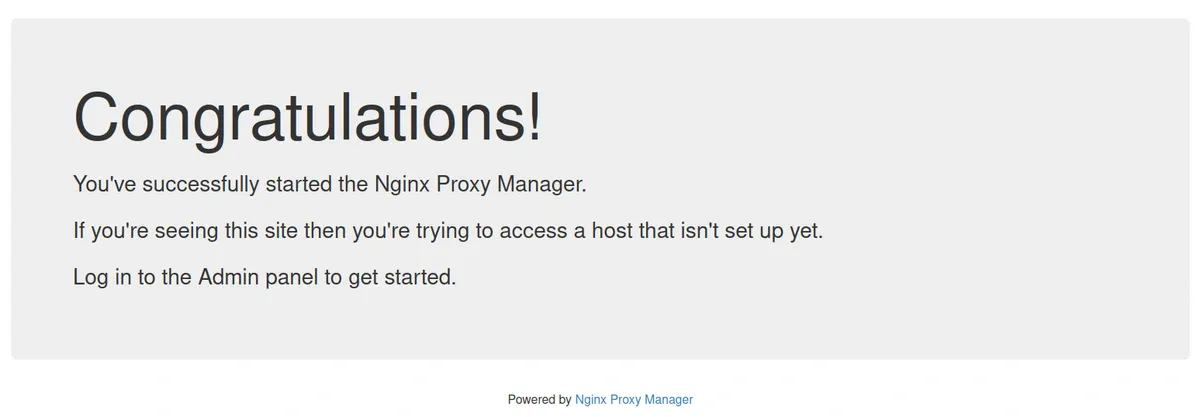
Enter your server’s IP address into your browser. You should be greeted with your first webpage:
4.5: Logging into Nginx Proxy Manager
Go to
<your-server-ip>:81in your browser. This will take you to port 81, which hosts your Nginx Proxy Manager interface.The default login is
admin@example.comwith the passwordchangeme.

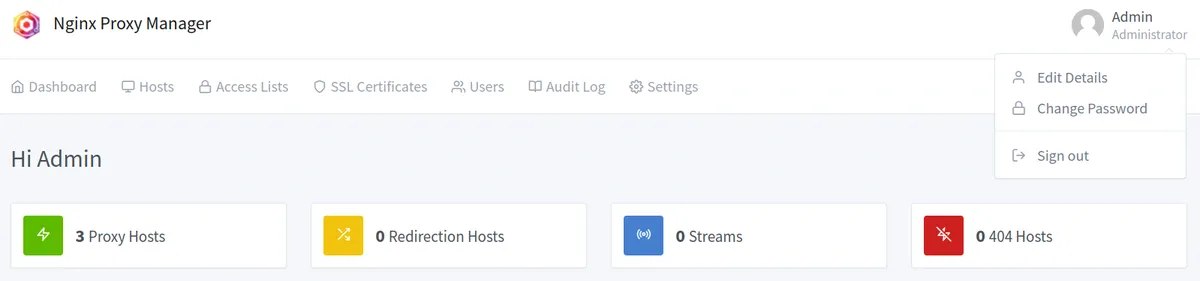
Once logged in, navigate to the Admin panel, located in the right corner of the interface.
Change your username and password to something safe and memorable. Don’t forget to save these new login details in a secure place.
4.6: Put the Admin UI Behind Your Domain
Go to Hosts → Proxy Hosts → Add Proxy Host.
In the form, enter your registered subdomain (e.g., nproxy.yourdomain.com).
For the IP address, use the service name
npmfrom the Compose file.Set the Forward Port to 81, and enable Block Common Exploits as well as Websockets Support.
Save, then test http://nproxy.yourdomain.com in your browser.

4.7: Enabling SSL
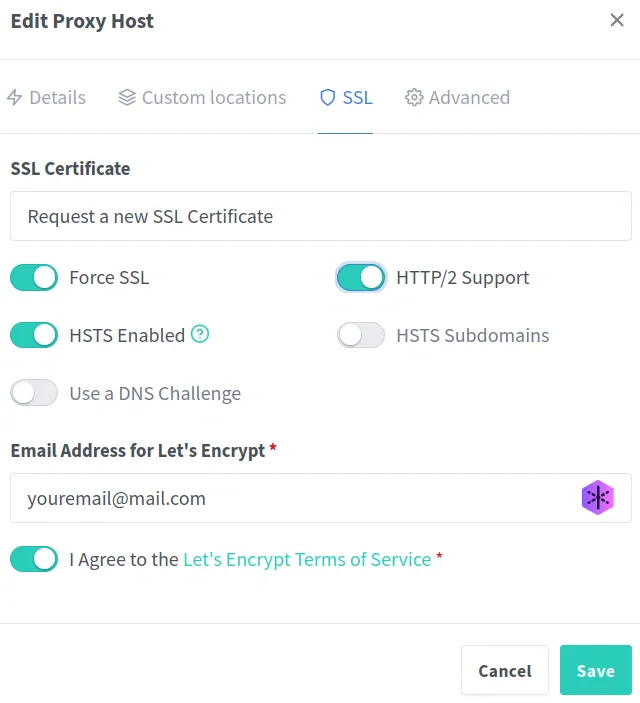
Once your subdomain is accessible, edit the domain entry in your proxy manager.
Go to the SSL tab and select “Request a new SSL Certificate”.
Force SSL, enter your email address, and agree to the terms of service.
SSL certificates are usually valid for 90 days, and the Proxy Manager will renew them automatically. If not, you’ll receive an email notification when it’s time.
After saving these settings, your subdomain should be accessible securely via HTTPS (e.g., https://nproxy.yourdomain.com). HTTP requests will automatically redirect to HTTPS.
4.8 Close the Public Admin Port (tidy up)
Now that the admin UI works via your domain, remove the public :81 exposure. First, edit your docker-compose.yml file. We only make two small changes:
services:
npm:
image: 'jc21/nginx-proxy-manager:latest'
restart: unless-stopped
ports:
- '80:80'
# - '81:81'
- '443:443'
expose:
- '81'
volumes:
- ./data:/data
- ./letsencrypt:/etc/letsencrypt
networks:
- npmnet
networks:
npmnet:
name: npmnet- 1
- Comment out or delete this line.
- 2
- Create this line, and specify the internal port 81.
Save and exit again. Apply changes:
docker compose up -dWhy did we do this? We just needed to open port 81 for the setup. Now that we can access NPM through our subdomain, it’s safer to close port 81. NPM now knows to listen on internal container port 81 and recognizes that when we access our subdomain, we want to access the admin interface.
Thus, let’s close port 81 again, using our firewall:
sudo ufw delete allow 81/tcpTry your subdomain again to make sure you can still access your NPM interface.
Troubleshooting
A-Record Delays: A-records can take a few minutes. Try mobile data (off Wi-Fi) to bypass local DNS cache.
Firewall Settings:
sudo ufw allowshould show 80/tcp and 443/tcp allowed (port 81 can be closed after domain setup).Container status: Run
docker psto confirm NPM is running (docker ps -ato see all containers, even if they are not running);docker logs <container_id>for details if needed.Further Learning: There are many tutorials on YouTube, e.g. from Christian Lempa and Awesome Open Source.
Step 5: Marvel At Your Accomplishment!

You did it. You picked the blue pill and stood up your own entry point to the web. You now have:
A VPS with a regular user, updates applied, and UFW guarding the door
Docker + Compose ready to run apps in tidy, isolated containers
A domain pointing at your server
NPM online behind https://nproxy.yourdomain.com with Let’s Encrypt
From here, spinning up apps is mostly “drop a docker-compose.yml → run docker compose up -d → add a Proxy Host → request HTTPS”. Think Nextcloud, OpenProject, a Quarto site, Stirling-PDF - whatever you want to self-host.
Of course, it’s not just friendly visitors out there. Before you roll out more services, we’ll harden the box so you can sleep at night.
Step 6: Keeping the Bad Guys Out
You might be thinking: “I’m not running a bank. Who’s going to target me?” Fair question, and the answer is mostly no one, specifically. The real risk is the constant background noise of the internet: automated bots that scan every reachable server for common mistakes and known vulnerabilities. You don’t need enemies for trouble to find you.
Here’s a simple threat model for a small, self-hosted setup like ours (Nextcloud, a personal site, a couple of tools; ~1–10 regular users, modest traffic):
Likely threats (opportunistic)
Trying to get in via credential stuffing and SSH/web brute force
Probing for default/admin panels (e.g., :81, /wp-admin)
Known vulnerabilities in outdated Docker images or apps
Misconfigurations (open ports, weak headers, exposed dashboards, default passwords)
Less likely (targeted):
- Manual intrusion, bespoke exploits, social engineering
If one of the “easy” vectors works, three bad outcomes are common:
Downtime: your tools disappear just when you (or co-workers/friends) need them.
Data loss or extortion: encrypted or deleted files, especially painful without backups.
Abuse of your server: crypto-mining, spam campaigns, attacks on other servers. Your provider may throttle, suspend, or bill you for the traffic burst.
For perspective, my own VPS sees thousands of daily pokes and prods, nearly all automated. A quick snapshot from CrowdSec (we’ll set it up shortly):
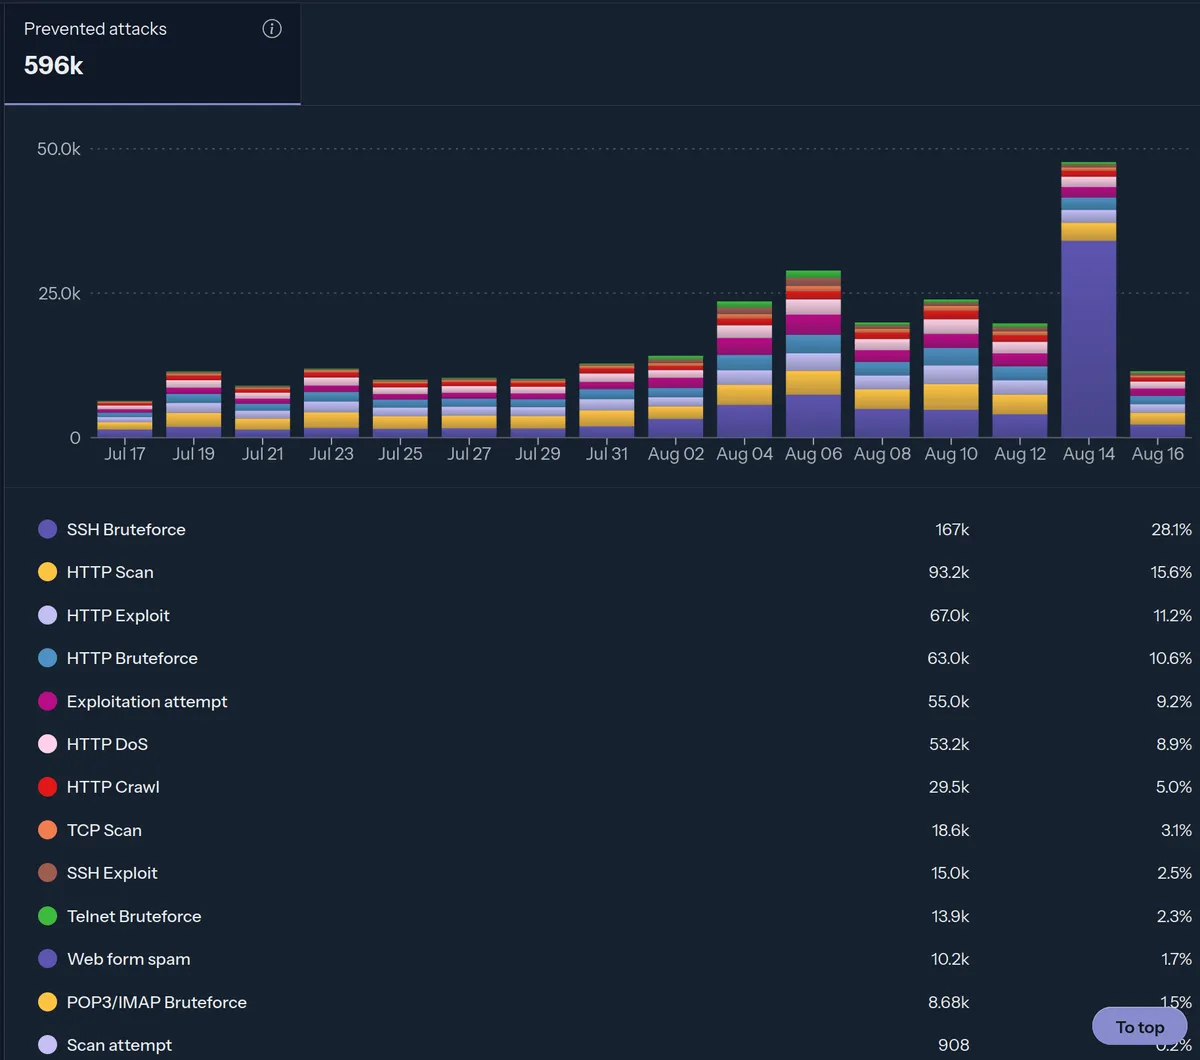
Yes, that’s right. There have been nearly 600,000 (detected) attacks on my irrelevant little VPS in the last 30 days. Most of these attempts don’t succeed because they look for things we either don’t run (e.g., WordPress by default) or we’ve already closed off (e.g., public port 81, weak passwords). With a few more guardrails, we’ll make nearly all of this noise harmless. The goal isn’t “perfect security”, it’s practical resilience: simple steps that dramatically reduce risk without turning your VPS into a second job.
6.1: 2FA for Your VPS Provider Interface
This one is oddly under-discussed: secure your VPS provider account first. The strongest server hardening won’t help if someone logs into your provider dashboard and destroys/rebuilds your machines.
Many providers support two-factor authentication (2FA) using either authenticator apps (TOTP) or hardware keys (FIDO2/WebAuthn, such as Nitrokeys).
If you don’t want to use 2FA, at least use a strong password and store it safely.
6.2: SSH Hardening
Brute-force logins over SSH are one of the top background nuisance on any public server. The single biggest win is to use SSH keys and disable passwords. If you haven’t set up keys yet, do that first (see earlier step).
6.2.1: Rate-limit SSH with UFW
Keep SSH usable for humans but noisy for bots:
sudo ufw limit 22/tcp- 1
- This adds a rate-limited rule for port 22 so repeated connection attempts (non-human speed) from the same IP are temporarily throttled/dropped. It won’t block you during normal use.
6.2.2: Lock Down SSH Access Settings
Next, we will adjust some SSH settings directly. Our general approach is as follows: Disable anything we don’t need so that others can’t exploit it.
Open the SSH config file:
sudo nano /etc/ssh/sshd_configPaste the following code at the end of the file (manual changes needed in the last one). Alternatively, you can uncomment and modify the existing specifications. The code annotations explain what each setting does.
PermitRootLogin no
PasswordAuthentication no
ChallengeResponseAuthentication no
X11Forwarding no
MaxAuthTries 3
LoginGraceTime 30
AllowTcpForwarding no
AllowAgentForwarding no
PermitTunnel no
AllowUsers USER ANOTHERUSER- 1
- Disabling root login reduces a common attack surface. Ensure that logging in as your created user works properly before enabling this setting.
- 2
- Disable password authentication (e.g., when used in conjunction with root, a common brute-force attack).
- 3
- Challenge Response Autentication is the general concept of authentication via a “challenge.” One example is being asked for a password, so disable this as well.
- 4
- X11 forwarding enables the display of remote graphical applications via an SSH connection. Not sure what that’s useful for? Disable it.
- 5
- Set the maximum authentication attempts per connection to three. Exceeding this limit requires a reconnect. Frequent reconnections trigger other security measures, such as CrowdSec or Fail2Ban.
- 6
- This is the window in which a user must authenticate after connecting. It ensures that an unauthenticated session isn’t left open for long, which reduces the risk of certain denial-of-service (DoS) attacks that stack up open SSH sessions.
- 7
- You can use forwarding a TCP for something like a remote developer IDE (over SSH) or reverse port forwarding. You probably don’t need it, so disable it.
- 8
- This allows you to jump from the VPS to a third server and authenticate with a local key. This is very likely not needed in a non-business environment.
- 9
- Disable SSH-based VPN tunnels if you don’t plan on using one.
- 10
- Only allow access via SSH for specific accounts. Replace “USER” and, optionally, “ANOTHERUSER” with existing users (lowercase-only). This follows the “principle of least privilege”, which is a common approach of only granting privileges to users who need them.
Here are some further settings you might find useful, but are not essential for common use cases:
ClientAliveInterval 300
ClientAliveCountMax 1
DebianBanner no
Port 22- 1
- Send an inactivity probe every five minutes. This is useful if you access your VPS in an environment where multiple (potentially untrusted) people have access to the hardware. When combined with the following setting, it ensures that a forgotten session will close after a period of inactivity.
- 2
- Setting this to 0 will terminate the session after five minutes. Setting it to 1 will tolerate one inactive period of ten minutes before closing the session.
- 3
- Do not show the login banner containing the OS and SSH version to potential attackers. We’ve entered the realm of the slightly paranoid.
- 4
- Change the port from the default of 22, which attackers often probe, to a higher number (>1024), such as 4567. Most automatic port scanners don’t scan that high for SSH. Open that port so you can use it for SSH logins later (and close 22 afterwards). Connect with ssh -p 4567 youruser@your_server_ip.
Now apply changes. Keep your current SSH session open and test a second login in a new terminal before you close anything:
sudo systemctl restart sshThis is already quite comprehensive, but there are always more approaches. For further information, refer to SSH hardening guides like this one from Tensordock.
6.3 Unattended Upgrades
SSH is locked down. Now make sure your OS security patches install themselves. On Ubuntu, that’s what unattended-upgrades does.
First, enter the following command to start the setup process. You will then see some straightforward prompts.
sudo dpkg-reconfigure --priority=low unattended-upgradesNow, check to see if the settings meet your expectations.
sudo nano /etc/apt/apt.conf.d/50unattended-upgradesBy default, only security updates are applied (safest choice). You can also enable a few sensible extras:
Unattended-Upgrade::Remove-Unused-Kernel-Packages "true";
Unattended-Upgrade::Remove-Unused-Dependencies "true";
Unattended-Upgrade::Automatic-Reboot "true";
Unattended-Upgrade::Automatic-Reboot-WithUsers "false";
Unattended-Upgrade::Automatic-Reboot-Time "03:30";- 1
- Enable automatic removal of unused kernel packages.
- 2
- Enable automatic removal of orphaned packages.
- 3
- Enable automatic reboots after (kernel) upgrades.
- 4
- Don’t automatically reboot if users are logged in.
- 5
- Specify the time of the automatic reboot, here 03:30.
Make sure to delete any comments (lines beginning with “//”) in the file to activate the options.
Test your configuration with a dry run to see what would happen if an automatic upgrade were triggered:
sudo unattended-upgrades --dry-run --debug6.4 Installing CrowdSec
6.4.1: What is CrowdSec?
SSH is now hardened, but bots don’t stop at SSH. They also probe web ports (80/443), default admin paths, and known vulnerabilities. A general security engine such as CrowdSec can help with that, by:
- Detecting suspicious patterns (e.g., brute force, scanners) from your logs and blocking the offending IPs automatically via your firewall.
- Block known bad IPs automatically via blocklists, before they can try anything.
I especially like the community feature: when many servers report abusive IPs, everyone benefits from fresher blocklists. The Community Edition is free and more than enough for personal use.
However, installing it in combination with Docker and NPM used to be quite confusing. In fact, some developers even forked NPM to enable easier setup. Fortunately, I found an awesome blog post by Ralf Kirchner on the ksite website. It resolved the mystery completely. It is in German, so I translated the essential installation steps for you. For more information, visit Kirchner’s excellent blog post. It includes a diagram showing how CrowdSec works with NPM. Kudos to Kirchner for making CrowdSec easily accessible for NPM users.
6.4.2: Install CrowdSec (container)
We’ll run CrowdSec in a container and give it read-only access to the logs it needs - auth.log, syslog, and NPM logs. We also add a restricted socket proxy so CrowdSec can talk to Docker without exposing the raw Docker socket.
6.4.2.1: Pick a Custom Docker Network Subnet
First, you need a Docker network subnet. Use a small private range that doesn’t collide with your existing Docker networks. You can list available subnets like this:
sudo docker network inspect $(sudo docker network ls -q)|grep -E "Subnet"A good default is:
- Subnet: 172.28.5.0/24
- Gateway: 172.28.5.1
- CrowdSec IP: 172.28.5.254
6.4.2.2: Create a Working Directory and docker-compose.yml
mkdir ~/crowdsec && cd ~/crowdsec
nano docker-compose.yml
Paste the following content: If you choose a different subnet, be sure to update it.
services:
crowdsec:
image: crowdsecurity/crowdsec:latest
restart: unless-stopped
environment:
COLLECTIONS: "crowdsecurity/linux"
DOCKER_HOST: tcp://socket-proxy:2375
volumes:
- crowdsec-db:/var/lib/crowdsec/data/
- crowdsec-config:/etc/crowdsec/
- /etc/crowdsec/acquis.yaml:/etc/crowdsec/acquis.yaml
- /var/log/syslog:/var/log/syslog:ro
- /var/log/auth.log:/var/log/auth.log:ro
depends_on:
- socket-proxy
networks:
crowdsec:
ipv4_address: 172.28.5.254
socket-proxy:
restart: always
image: lscr.io/linuxserver/socket-proxy:latest
environment:
INFO: 1
CONTAINERS: 1
POST: 0
BUILD: 0
COMMIT: 0
CONFIGS: 0
DISTRIBUTION: 0
EXEC: 0
GRPC: 0
IMAGES: 0
NETWORKS: 0
NODES: 0
PLUGINS: 0
SERVICES: 0
SESSION: 0
SWARM: 0
SYSTEM: 0
TASKS: 0
VOLUMES: 0
volumes:
- '/var/run/docker.sock:/var/run/docker.sock:ro'
read_only: true
tmpfs:
- /run
networks:
crowdsec:
volumes:
crowdsec-db:
crowdsec-config:
networks:
crowdsec:
driver: bridge
ipam:
config:
- subnet: 172.28.0.0/16
gateway: 172.28.5.1
external: false- 1
- Insert CrowdSec IP here.
- 2
- Insert the chosen subnet here.
- 3
- Insert the gateway here.
Save and exit.
6.4.2.3: Provide an Acquisition File
Create a config file that specifies which logs CrowdSec should read:
sudo mkdir -p /etc/crowdsec && sudo touch /etc/crowdsec/acquis.yamlPaste:
filenames:
 - /var/log/auth.log
 - /var/log/syslog
labels:
  type: syslog
---
Save and exit.
Start your CrowdSec container with:
sudo docker compose up -d6.4.3: Install the Firewall Bouncer
This is the component that inserts firewall rules (iptables, same as UFW) to block abusive IPs.
Get and run a helper script:
curl -s https://install.crowdsec.net | sudo shInstall the Firewall Bouncer:
sudo apt update && sudo apt install crowdsec-firewall-bouncer-iptablesThe bouncer needs to communicate with the CrowdSec container via API. Create an API-key with:
sudo docker exec -t crowdsec-crowdsec-1 cscli bouncers add HostFirewallBouncerCopy the generated API-key. Now open the configuration file of the bouncer:
sudo nano /etc/crowdsec/bouncers/crowdsec-firewall-bouncer.yamlPaste:
mode: iptables
piddir: /var/run/
update_frequency: 10s
daemonize: true
log_mode: file
log_dir: /var/log/
log_level: info
api_url: http://172.28.5.254:8080/
api_key: <api-key here>
disable_ipv6: true
iptables_chains:
- INPUT
- DOCKER-USER- 1
- Should match the Docker IP from the compose file.
- 2
- Insert the generated API-key here.
- 3
- Optionally, you can disable IPv6 if not needed.
Save and exit.
Start the bouncer:
sudo systemctl start crowdsec-firewall-bouncer.serviceCheck its status (should say active/running):
sudo systemctl status crowdsec-firewall-bouncer.service6.4.4: Feed NPM Logs to CrowdSec
CrowdSec needs to see NPM’s logs to detect web-layer abuse on your proxy hosts.
Decide where you want the logs on the host, e.g.:
sudo mkdir -p /var/log/crowdsec/proxyEdit your NPM docker-compose.yml (the one in your ~/nproxy directory) and add this extra bind mount under the NPM service:
volumes:
- /var/log/crowdsec/proxy:/data/logs- 1
- This overlays the /data/logs path inside the NPM container so logs are written to /var/log/crowdsec/proxy on the host.
Restart the container:
cd ~/nproxy
docker compose up -d
Tell CrowdSec to read those logs. Back to your CrowdSec config:
cd ~/crowdsec
sudo nano /etc/crowdsec/acquis.yaml
Append another source:
filenames:
  - /var/log/crowdsec/proxy/*.log
labels:
  type: nginx-proxy-manager
Make one more adjustment to the compose file, and you’re done. Make sure the following lines are included under “environment” and “volumes”:
environment:
COLLECTIONS: "crowdsecurity/linux crowdsecurity/nginx-proxy-manager"
volumes:
- /var/log/crowdsec/proxy/:/var/log/proxy/:ro- 1
- Update CrowdSec’s container env to load the right scenarios.
- 2
- Mount the log path read-only.
Then restart:
docker compose up -dTest your settings by banning the current public IPv4 of your local machine for 2 minutes:
sudo docker exec -t crowdsec-crowdsec-1 cscli decisions add --ip <YOUR_PUBLIC_IPv4> --duration 2mTry to open https://nproxy.yourdomain.com from that machine; you should be blocked for two minutes.
To print all CrowdSec bans use:
sudo docker exec -t crowdsec-crowdsec-1 cscli decisions listIf you see entries (and you got blocked), your server is now protected by CrowdSec!
Upgrading CrowdSec in the future
To upgrade the container image itself, you can use a regular:
docker compose pull && docker compose up -dTo upgrade hubs (parsers, scenarios, collections), use:
docker exec crowdsec cscli hub updateThen:
docker exec crowdsec cscli hub upgrade6.4.5 (Optional): CrowdSec Cloud Console
The free Cloud Console gives you nice dashboards and curated blocklists you can subscribe to. If you want that, create an account at https://app.crowdsec.net/ → Engines → Add (copy the enroll key).
Back on your server, run the following command to connect your CrowdSec with the Cloud Console. Make sure you paste your actual key.
sudo docker exec -t crowdsec-crowdsec-1 cscli console enroll -e context <YOUR_ENROLL_KEY>You’ll see some output printed that confirms successful enrollment. Back in the Cloud Console, you need to accept the enrollment.
After that, restart the CrowdSec container:
sudo docker compose restartTip: Under Blocklists → Search → Tier = Free you can subscribe to up to four additional lists. A good heuristic is the number of subscribers.
All done! You can watch blocked attack statistics under Security Engine → Remediation Metrics whenever you feel like it. You won’t have to wait long for attacks to appear, even on new servers. Note that Kirchner’s tutorial includes additional screenshots and optional steps, such as setting up email notifications and whitelisting DynDNS IPs. Be sure to stop by!
Simple and Lightweight Alternative to CrowdSec
If you find CrowdSec to be too much, you can opt for a combination of fail2ban for SSH brute-force protection and automated blocklist pulling. This approach provides a fair amount of the protection that CrowdSec offers, with less overhead. Note that this approach lacks scenario-based blocking unless you manually configure fail2ban.
Install fail2ban via:
sudo apt install fail2banAdjust settings:
sudo nano /etc/fail2ban/jail.d/sshd.localEnter the following for SSH protection:
[sshd]
enabled = true
maxretry = 5
findtime = 10m
bantime = 120m- 1
- After five failed SSH logins …
- 2
- … within 10 minutes …
- 3
- … ban for two hours.
Enable:
sudo systemctl enable --now fail2banSee recent successful logins:
grep "Accepted" /var/log/auth.log | awk '{print $1, $2, $3, $9, $11, $13}' | tac | column -tYou can also monitor fail2ban’s activity:
sudo fail2ban-client status sshdFor the blocklist part, you can use a simple approach outlined in a Ken Harris blog post. Pull the IPsum blocklist, which is regularly updated. GitHub user arter97 provides a convenient script for easy and efficient usage:
sudo wget https://gist.githubusercontent.com/arter97/2b71e193700ab002c75d1e5a0e7da6dc/raw/firewall.sh -O /opt/firewall.sh
sudo chmod 755 /opt/firewall.sh
sudo /opt/firewall.sh- 1
- Pulls the arter97 script.
- 2
- Sets permissions.
- 3
- Executes the script.
Check if it is working:
sudo dmesgAdd a cronjob to automatically update the blocklist every day:
sudo crontab -ePaste:
@reboot /opt/firewall.sh
0 4 * * * /opt/firewall.sh- 1
- Execute the script again after every reboot.
- 2
- Execute the script at 04:00 to update the blocklist.
6.5.: Security Headers
Feeling more confident about your setup already? Nice. One more lever: security headers.
When a browser talks to your site, these headers tell it what it’s allowed to do. Used well, they reduce risks like clickjacking, content injection, and data leakage.
A handy checker is https://securityheaders.com/. Paste your URL and you’ll get a quick grade (F → A+). If you test your NPM admin subdomain now, you’ll likely score poorly, because we haven’t set any headers yet. Let’s fix that.
6.5.1: Where to Add Headers in NPM
Open your host in Nginx Proxy Manager → Hosts → Proxy Hosts → Edit:
- SSL tab: make sure Force SSL is on and HSTS is enabled (optionally include subdomains). This is header setting we can apply easily via GUI.
- Advanced tab: paste the header snippet below and Save.
Heads-up: Apps differ. Some (e.g., Nextcloud) set their own headers and can break if you override them. If an app misbehaves after you add headers, loosen the policy for that host or let the app handle headers itself.
6.5.2: A Sensible Default Header Set
Paste this into the Advanced field of your host in NPM. It uses “more_set_headers” which works out-of-the-box with NPM’s nginx.
more_set_headers "X-Content-Type-Options: nosniff";
more_set_headers "Referrer-Policy: strict-origin-when-cross-origin";
more_set_headers "X-Frame-Options: SAMEORIGIN";
more_set_headers "Permissions-Policy: geolocation=(), microphone=(), camera=()";
more_set_headers "Content-Security-Policy: default-src 'self'; script-src 'self' 'unsafe-inline' https:; style-src 'self' 'unsafe-inline' https:; img-src 'self' data: https:; font-src 'self' https:; object-src 'none'; frame-src 'self' https:;";- 1
- This stops browsers from MIME sniffing and interpreting files as a different type than what is declared, which is used in some attacks. It is almost always a good idea to set this.
- 2
- It sends the full referrer to same-origin resources, but only the origin (not the path or query) to other origins. Nothing is sent over HTTP from HTTPS. For maximum privacy, use “no-referrer,” though it may be excessive.
- 3
- It blocks other origins from framing your pages. This is a common setting if you don’t anticipate that your site needs to be embedded elsewhere.
- 4
- Most sites don’t require the use of geolocation, microphone, or camera. It’s safer to disable these features. However, note that if an app requires one of these features, you must allow it, e.g., by setting “microphone=(self)”.
- 5
- The entire string is a “Content Security Policy” (CSP). It establishes rules for content-related actions, such as fetching logos from other websites. The default settings are reasonable for general purposes. However, adjusting “script-src” and “style-src” based on the needs of a specific application could enhance security, especially by eliminating “unsafe-inline.”
After pasting and saving, check your score again.
6.6: Some Additional Security Topics Worth Looking Into
Great job on hardening your system! You’re doing well, and I dare say better than average. A few additional habits will make your setup safer and easier to manage.
6.6.1: Backups
You need a backup system of some kind. This is extremely important. I recommend using the automatic backup and snapshot features of your VPS provider. For example, with Hetzner, you can opt in to automatic daily snapshots. If something goes wrong, you can easily revert to the last working state with two clicks. That’s gold! It has saved me several times after entering a lot of (dumb) commands into the console that I couldn’t remember/understand/revert.
Another (or better additional) option is to automatically copy important files from your server to a remote location, such as your local machine. There are many online tutorials on how to do this, and all the good ones urge you to test whether you can actually restore from a backup. A backup that you’ve never tested is a wish, not a backup.
Whatever you do, never skip backups.
6.6.2: Keep Docker Containers Up to Date
Your OS now auto-patches security updates. Containers don’t.
- Update rhythm: It’s a trade-off between convenience and security. The longer the update intervals, the greater the risk of having an exploitable vulnerability in one of your services. If you don’t plan on updating regularly, consider using a web application firewall (WAF).
- Process: In each app directory, just run
docker compose pullanddocker compose up -d. - Check release notes first: Skim the app’s repo for breaking changes. The devs usually make clear what to adjust/keep in mind when upgrading. The possibility of breaking changes is the reason I don’t use auto-updaters such as Watchtower forks.
Also run general host uppgrades now and then:
sudo apt update && sudo apt upgrade6.6.3: Use Safe Docker Settings
Small Compose tweaks go a long way.
- Expose only 80/443 on the VPS; let NPM talk to apps over a private Docker network (via “expose” instead of “ports”). If you want extra privacy/security, you can use “internal: true” for a given Docker network, which prevents containers on that network from initiating outbound connections. Note that it may cause disruptions if the app requires outbound connections.
- Consider not hardcoding passwords and keys (“secrets”) into your compose files. You can store them in .env files with restricted permissions (chmod 600) or mount them from protected paths. Search for Docker Secrets tutorials.
- (Advanced) Rootless containers: Might be worth it for exposed services or custom images, but expect a little extra setup/testing. Check out 11note’s primer on rootless containers images.
- (Advanced) Distroless images: Images that contain only your app and its runtime, no shell/package manager. Significantly smaller attack surface and smaller/more lightweight. Great when you build your own images; tricky to retrofit third-party images. That’s already going in the direction of bank-grade security. Check out 11note’s primer on distroless container images.
Wrap Up
From scratch to a genuinely secure, flexible server - nice work.
From here, you can start adding services. I have step-by-step tutorials for Nextcloud, OpenProject, Stirling-PDF, and more.
For broader inspiration, browse the excellent selfh.st app finder.
Thank you for following along - dot by dot.
Giving Back
Every day, talented folks build and maintain powerful open-source tools, often for free. If one of them made your life easier, consider giving something back:
Tip or sponsor a maintainer (e.g., buy jc21, the creator of NPM, a coffee)
Star the projects you use on GitHub (helps visibility)
File useful, reproducible bug reports
Contribute docs, translations, or small fixes
Help other users to get it right
Blue-pill energy is about building and sharing. Your server is a great start.