Changelog
2025/06/08: Included a quick look; updated the Dockerfile to be more efficient and produce a more lightweight image; removed the Docker run approach in favor of a Docker Compose file with better Docker networking.
So, You Want Your Own Website
You want a simple, customizable website without spending a lot of time learning web programming. HTML, CSS, and JavaScript for front-end, and Python, Node.js, or PHP for back-end development sound like too much. You also don’t want to spend money or deal with limited “free” plans. Quarto is the solution for you!
What is Quarto?
Quarto is an open-source publishing system that lets you create dynamic documents, presentations, books, and websites. It works with R, Python, and Julia, and supports multiple formats like HTML, PDF, Word, and ePub. Quarto is flexible, free, and easy to learn, with no usage limits. It even has a graphical user interface and can be used in RStudio, Visual Studio Code, and the Terminal.
Creating A Website With Quarto
This guide focuses on creating a static website with Quarto. A static website is rendered once and served as is, without any background computations or interactive features. Quarto’s official guide is excellent, and there are plenty of online tutorials to help you learn quickly and achieve results within hours. This guide will help you get started, introduce common settings, and provide links to further resources. The deployment process can be tricky, so I’ll give extra attention to that part.
In this tutorial we will create a website for Ben, the family Dalmatian. The site is actually hosted here, so you can see how the settings look like in action. The website directory including all files is here.
📦 App Info
- Logo:

- Purpose: An open-source scientific and technical publishing system
- Deployment: Anywhere you can host static HTML pages, including custom hosting (e.g. Docker) or services such as Quarto Pub, GitHub Pages, Netlify
🔍 Tech & Usage
- Stack: Quarto (Rust core), Pandoc, Markdown, optional R/Python/Julia
- Memory: ~6 MB idle (this site, expect much more with interactive components)
- Disk: ~200 MB (this site)
- CPU: Minimal for static sites
📜 License & Community
- License: Open Source (MIT for Quarto core)
- Pricing: Free
- Type: Open-source project backed by Posit
- User Base: Large
Step 1: Initiate a Quarto Website Project
Open RStudio.
Go to File -> New Project.
Choose Quarto website, and then new directory.
Name your project folder and specify its location (using
~for the home directory).Choose the options you prefer to enable. Note that
renvis for package version management, which isn’t needed if you don’t plan to use packages. Keep the visual markdown editor enabled for an easier graphical interface for tasks like adding images. You can toggle between the Visual and Source editor.
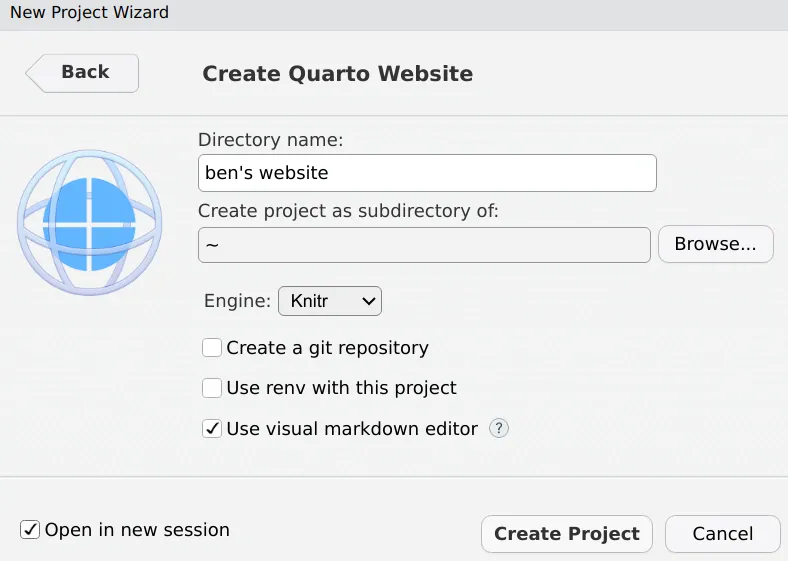
After clicking “Create Project”, Quarto will generate a folder with the following contents:
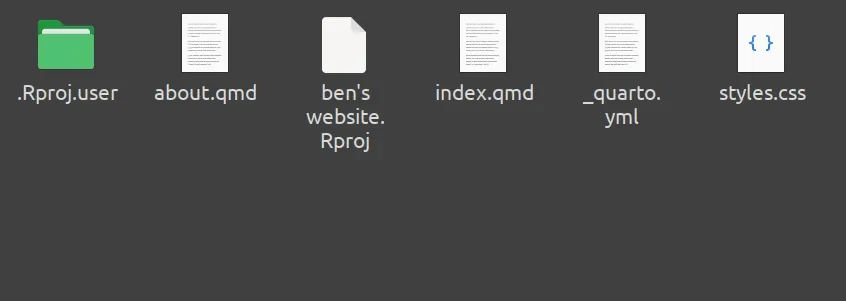
ben’s website.Rproj: The R-project file. Open this whenever you want to work on the website.
_quarto.yml: Defines the main structure and appearance of the website.
styles.css: Customize the appearance of the website (font, font size, colors, etc.). Initially empty.
index.qmd: The main content of the website.
about.qmd: Content for the “About” page. Can be the same as index.qmd if you want the “About” page to be the main page.
Open the _quarto.yml and index.qmd files. Click “Render” (blue arrow) to render the site, which will open in a browser for preview. After the first rendering, a new folder “_site” will appear, storing the rendered website files. Any changes you make and render again will update these files.
What are YML files?
YML (YAML Ain’t Markup Language) files are text files used for data serialization. They outline configurations in a human-readable format. In Quarto, the \_quarto.yml file specifies the structure and appearance of your website. It’s great to get familiar with YAML, because it is frequently used in all kinds of software (e.g. Docker).
Below the “Render” button, you’ll find “Source” and “Visual” tabs. The Source tab offers a classic coding experience, while the Visual tab provides a word processor-like interface with graphical options for including images, lists, and more. Changes in one tab are reflected in the other.
Step 2: Basic Website Appearance
Let’s start with some general settings for your website. The default _quarto.yml file looks something like this:
project:
  type: website

website:
  title: "ben's website"
  navbar:
    left:
      - href: index.qmd
        text: Home
      - about.qmd

format:
  html:
    theme: cosmo
    css: styles.css
    toc: true

editor: visual
Now, let’s make some changes. The annotations explain each change or addition.
project:
type: website
output-dir: _site
website:
favicon: favicon.png
title: "Ben's Website"
site-url: https://testwebsite.dgerdesmann.de
navbar:
left:
- href: index.qmd
text: About
- publications.qmd
- gallery.qmd
- blog.qmd
tools:
- icon: twitter
href: https://bsky.app/profile/ben-the-dog.bsky.social
- icon: github
href: https://github.com/BENevolent_code
reader-mode: true
page-navigation: true
back-to-top-navigation: true
page-footer:
center: "The only cookies I like are the ones you can eat."
background: light
description: "Some posts about Ben."
announcement:
icon: info-circle
dismissable: true
content: "**Please note** - This is a test website associated with the Quarto website tutorial at https://dgerdesmann.de/posts/quarto-website"
type: warning
position: below-navbar
format:
html:
theme:
dark: darkly
light: flatly
css: styles.css
toc: false
editor: visual- 1
- Explicitly sets the output directory for the rendered files to _site. This is the default, so it doesn’t change anything.
- 2
- Adds a favicon (tiny logo) to your page. Place a PNG image named favicon.png in the root directory. You can use favicon generators to convert the image to favicon format or size for better compatibility.
- 3
- Specifies the domain where users can find your website after deployment. It’s only necessary for generating sitemaps and social metadata thumbnails. You can enter a placeholder like ‘https://mydomain.com’ if you don’t plan to use either.
- 4
- Configures website navigation. The content of the index.qmd file is listed under a “About” tab. Additional tabs for “Publications”, “Gallery” and “Blog” are added. Create publications.qmd and blog.qmd files in your website’s root directory to specify their content.
- 5
- Adds social media and GitHub icons that link to your accounts.
- 6
- Enables a reading mode option for users.
- 7
- Adds a footer to your page.
- 8
- Add an announcement bar to your page. See below what that is about.
- 9
- Sets the theme for your site, allowing users to toggle between dark (darkly) and light (flatly) modes.
In the end, it’s just a matter of going through the options outlined in the Quarto’s website guide and implementing what you want. Tip: Create a YAML file with all options and comment out the ones you don’t need (with #). Add a short description for each option. This will give you a good overview of what you can do.
Step 3: Add Content
After setting up the general settings, let’s add content to the main page. For an academic website, this typically includes a page about yourself. Open the index.qmd file in your website’s root directory. Here’s a template with some options and annotations:
---
title: "Ben"
image: images/ben_profile.jpg
about:
template: trestles
image-width: 15em
image-shape: round
links:
- icon: twitter
href: https://bsky.app/profile/ben-the-dog.bsky.social
- icon: github
href: https://github.com/dogs>cats
- icon: envelope-heart-fill
href: mailto:dogtor@ben-gerdesmann.dog
---
::: {style="text-align: center"}
### Hi,
:::
::: {style="text-align: justify"}
welcome to my pawsome corner of the internet! I'm Ben, a Dalmatian with a penchant for swimming, devouring delectable treats, and mastering the art of ball-catching. But don't let my playful antics fool you - I’m also an expert in the fine art of manipulating humans with my undeniable cuteness.
When I'm not splashing around in the water or munching on my favorite snacks, you can find me charming my way into extra belly rubs and treats. My human companions say I've got them wrapped around my paw, but hey, who could resist this face?
As an academic in the field of Canine Cuteness Studies, I’ve mastered the techniques of puppy eyes and tail wags to achieve optimal results in treat acquisition. My research is ongoing, but preliminary findings suggest that a well-timed head tilt can increase treat yield by up to 41% (p = .049).
Stay tuned for more updates on my adventures and research, and don’t forget to bring a treat next time you visit!
:::
## Experience
**Professional Treat Tester** at Home Kitchen \| 2014 - present
- Evaluated the palatability of various dog treats with a focus on flavor, texture, and crunch.
- Provided immediate feedback through enthusiastic consumption or polite refusal.
**Lead Ball Fetcher** at Local Park \| 2015 - present
- Retrieved an average of 34 balls per session with a success rate of 92%.
- Pioneered new techniques in catch-and-return efficiency.
**Human Manipulation Expert** at Home \| 2016 - present
- Developed advanced strategies in the application of cuteness for treat acquisition.
- Successfully increased daily treat allotment by 40% through targeted behavior.
## Education
**Doctorate in Cuteness Manipulation**, Canine University \| 2019 - 2022
- Dissertation: "The Efficacy of Puppy Eyes and Tail Wags in Human Compliance"
**Masters in Treat Detection**, Doggo Academy \| 2017 - 2019
- Thesis: "Sniffing Out Snacks: An Analysis of Treat Detection Techniques"
**Bachelors in Ball Fetching**, Pup University \| 2014 - 2017
- Capstone Project: "Maximizing Fetch Efficiency: A Study on Speed and Endurance in Ball Retrieval"- 1
- Quarto expects images you want to use to be in an “images” folder within the directory of the index.qmd file.
- 2
- Quarto offers five templates for about pages. Here we use “trestles”, and specify the image width and shape.
- 3
- You can add icons that link to your online profiles, such as social media accounts, research platforms, and email. You can use any of the over 2000 Bootstrap Icons. You can also use “text:” instead of “icon”.
Step 3.1: The About Page
If your index.qmd shows different content and you want to add an about page, you can populate ‘about.qmd’ as shown above and change the content of ‘index.qmd’. If ‘index.qmd’ is already about you, you can leave a simple ‘about.qmd’ with the following content:
---
title: "About"
---
This adds an “About” section to the navbar, acting as a home button for users to return to the main page.
Step 3.2: Publication Page
You can add more sections to your website by creating a new .qmd file in the root directory and populating it with content. For example, to add a “Publications” section, create a ‘publications.qmd’ file with the following content:
---
title: "Publications"
---
## 2022
Ben, D. (2022). The efficacy of puppy eyes and tail wags in human compliance. *Journal of Canine Behavioral Studies, 42*(3), 123-145. https://doi.org/fake.doggo/puppyeffect
{.aligncenter}- 1
- Place your images in the “images” folder to reference them.
Step 3.3: Gallery
You can repeat the process to add as many sections as you like. You might want to add a gallery of photos and videos. Just create a ‘gallery.qmd’ file and add content. A gallery from Ben, with instructions on how to add images and videos to Quarto, might look like this:
---
title: Ben's Gallery
---
# Adding Images
## Using Markdown
You can easily insert images using Quarto's graphical interface ('insert' menu). Here's an example with an image centered, with a caption, alt-text, and link:
[{fig-alt="This is alternative text." fig-align="center"}](https://tierheim-gelsenkirchen.de/)
If you click on an image in the visual editor, you will be given the option to change the image size.
## Using HTML
You can also use HTML directly (in the Source editor). Here’s the same image using HTML:
<a href="https://tierheim-gelsenkirchen.de/">
<figure style="text-align: center;">
<img src="images/ben_gal_2.jpg" alt="This is an alt-text." style="display: block; margin-left: auto; margin-right: auto;"/>
<figcaption>This is a caption.</figcaption>
</figure>
</a>
# Adding Effects via CSS
You can enhance the appearance of images with CSS. Here’s an example that enlarges the image and adds a shadow on hover:
<a href="https://tierheim-gelsenkirchen.de/">
<figure style="text-align: center;">
<img src="images/ben_gal_3.jpg" alt="This is alternative text." class="hover-effect" style="display: block; margin-left: auto; margin-right: auto; transition: transform 0.3s, box-shadow 0.3s; max-width: 900px; width: 100%; height: auto;"/>
<figcaption>This is a caption.</figcaption>
</figure>
</a>
<style>
.hover-effect:hover {
transform: scale(1.05);
box-shadow: 0 4px 8px rgba(0, 0, 0, 0.2);
}
</style>
Add a class ("hover-effect") to limit this effect to specific images. Note that the Quarto "insert" interface also includes a CSS field where you could enter CSS code.
# Adding GIFs
Quarto supports other formats like GIFs. Here’s how you can insert a GIF using Markdown:
{fig-alt="This is an alt-text" fig-align="center"}
## Using HTML and CSS for GIFs
Here’s an example that applies a greyscale effect to a GIF, which vanishes on hover:
# The HTML code looks like this
<style>
.gif-container {
text-align: center;
}
.gif-container img {
display: block;
margin-left: auto;
margin-right: auto;
filter: grayscale(100%);
transition: filter 0.3s ease;
}
.gif-container img:hover {
filter: grayscale(0%);
}
</style>
<div class="gif-container">
<img src="images/ben_gal_5.gif" alt="This is an alt-text">
<figcaption>This is a caption.</figcaption>
</div>
# Conclusion
Quarto makes it easy to insert images and videos. For advanced customization, you can use HTML and CSS directly.
{fig-alt="Aqua Dog" fig-align="center" width="900"}Check out the Gallery on the test site to see what these settings look like in action.
Step 3.4: Blog Posts
Next, let’s add a section for blog posts. Create a ‘blog.qmd’ file in the root directory with the following content:
---
title: "Blog"
listing:
contents: posts
type: grid
sort: "date desc"
categories: true
sort-ui: [title, date]
filter-ui: [title, date]
feed: true
---- 1
- Defines the general appearance of your posts, here set to a grid.
- 2
- Sorts the blog posts by date, from newest to oldest.
- 3
- Enables category tiles under the blog title, allowing users to see and search posts by category.
- 4
- sort-ui: Adds options to sort by title or date; filter-ui adds a text field for searching.
As you can see, there are some special options for blog posts that make it easy to have a nice, searchable grid of your posts. Head over to Quarto’s guide on blog posts to see the available options.
The ‘blog.qmd’ creates a blog post menu. To add individual posts, create a “posts” folder in the root directory. For each new post, create a subfolder in “posts” with a descriptive title. The name of the folder will be the part of the URL later (‘yourdomain.com/posts/foldername/index.html’). Inside each subfolder, add an ‘index.qmd’ file and an “images” folder if needed.
For example, if Ben wants to write a post about his research on cuteness, he would create a “1 - Ben’s Study” folder in “posts” and add an ‘index.qmd’ file with the following content:
---
title: "The Art of Cuteness: A Data-Driven Approach"
description: "Learn how I increased my treat outcomes using a data-driven approach."
title-block-banner: darkorange
title-block-banner-color: black
author: "Ben"
date: "2024/07/05"
code-annotations: hover
draft: false
categories:
- Human Subjects Research
- Behavioural Data
---
{fig-align="center"}
Hello, my fellow canine enthusiasts! It's your favorite spotted scholar, Ben, here to share some behind-the-scenes insights into my latest research. Today, I'll walk you through the science of cuteness manipulation with a fun and educational blog post. Buckle up, because we're diving into the data!
## Step 1: Gathering Data
You might wonder how a dog like me collects data. It's simple - treats! But this time, I'm also using more advanced techniques like measuring my human subjects' brain activity and eye movement. Here's a sample code snippet demonstrating how I track my treat acquisition using R:
# Sample code for tracking treats and human response
treats <- data.frame(
day = 1:7,
treats_received = c(5, 7, 9, 6, 8, 10, 12),
brain_activity = c(80, 85, 90, 82, 88, 92, 95), # Measured in cuteness units
eye_movement = c(50, 55, 60, 52, 58, 65, 70) # Number of times humans glance at me
)
# Plotting the data
library(ggplot2)
ggplot(treats, aes(x = day)) +
geom_line(aes(y = treats_received, color = "Treats Received")) +
geom_line(aes(y = brain_activity, color = "Brain Activity")) +
geom_line(aes(y = eye_movement, color = "Eye Movement")) +
labs(title = "Treat Acquisition and Human Response Over a Week",
x = "Day",
y = "Measurement",
color = "Legend") +
theme_minimal()
## Step 2: Visualizing the Results
Let's take a look at the results. Here's a plot showing the number of treats I received, along with the brain activity and eye movement of my human subjects over a week. As you can see, the more I perfected my cuteness techniques, the more treats I got and the more my humans were mesmerized!
{fig-align="center" width="700"}
## Step 3: Applying Advanced Techniques
Here's a snapshot of me in action, demonstrating my advanced cuteness techniques. I call this particular method the "Inquisitive Submarine". It's the perfect blend of essential treat acquisition techniques:
- You are visible, signaling interest. Don't forget the basics.
- Through your careful approach, you create the illusion that you are respecting the limits that humans have placed on you. Only overwhelming hunger drives you to make this humble request for some food.
- You keep the human's perception of generosity vs. strictness from tipping to the wrong side until the meal is prepared or nearly finished. Not giving you something would feel like a greedy betrayal to the human at that point!
{fig-align="center"}
**Pro Tip**: Always maintain eye contact. It creates a stronger bond and increases your chances of getting more treats! Also, don't use this technique when you're desperate. You'll probably be as subtle as a tanker.
## Research Ethics Note
Before you ask, yes, all my human subjects gave their informed consent for this study. Of course, a few extra belly rubs and tail wags were required to seal the deal. Remember, `<a`{=html} `href="`{=html}https://www.ncbi.nlm.nih.gov/pmc/articles/PMC7122250/`" target="_blank">`{=html} **ethical treatment of human subjects**</a> is nearly as important as getting those treats!
## Conclusion
Through a combination of precise data tracking, advanced probing techniques, and expert-level cuteness, I've managed to increase my treat intake significantly. Remember, the key is consistency and practice. Keep those tails wagging and treats flowing!
Stay tuned for more insights and paws-on research. Until next time, happy treat hunting!- 1
- Sets the color of the title banner.
- 2
- You can add code annotations that appear when hovering over code lines. (e.g. insert code block in the visual editor, add code, and use “# <1>” followed by “1. This is some texts that explains the code line” below the code block).
- 3
- Set to ‘true’ if the post is a draft and not ready for public view. It will not be shown in the blog post grid. You can still preview it locally by rendering its index.qmd file.
- 4
- We have enabled categories in the blog.qmd file. In each blog post file, you specify categories like this
- 5
- Display an image in the header of the post and in the blog post preview.
- 6
- Supply rendered plots as images to keep content static and reduce deployment complexity.
- 7
- You can insert a link using the visual editor in Quarto. However, I use this HTML wrapper instead. It ensures that clicking on the link opens a new browser tab, rather than following the link in the current tab.
Step 4: Add Some Extras
Announcement Bars
Quarto offers many features that are regularly updated. For example, a recently added feature (Quarto 1.5) is site announcement bars. You can find setup instructions in the Quarto guide. See the ’_quarto.yml’ file above for an example.
Custom 404 Page
Another useful customization is the 404 error page, which appears when a user tries to access a non-existent URL. To create a custom 404 page, add a 404.qmd file to the root directory of your website and populate it as follows:
---
title: "<center>404: Page Not Found</center>"
---
{fig-align="center"}
<center>The page you requested cannot be found (perhaps it was moved or renamed).</center>This custom 404 page might work automatically after deployment, but sometimes it requires additional server configuration, especially if deploying via Docker. Ensure your server setup points to your 404 page instead of the default, depending on the server image you use.
Usage Tracking
Want to keep track of your exponential fame? With Quarto, you can easily enable Google Analytics to track your website traffic. You can choose what and how user data is stored. If you don’t have a Google account or prefer more privacy-friendly tools, GoAccess or Matomo may be useful.
Search Engine Optimazation
You can really go nuts with Quarto if you want. For example, you can let Quarto create a sitemap. A sitemap is a file that provides information about the pages, videos, and other files on your website, and the relationships between them. Search engines like Google use this file to crawl your site more effectively. That can give your site a boost in search results, which is nice if you want your side to rise quicker in the search results if someone searches your name or a topic you wrote about. It’s hardly essential, I just mention it to show you how powerful and flexible Quarto is.
Step 5: Local Testing
Now, it’s time to thoroughly test your website. Render it again, browse through it, and consider asking someone else to test its usability. Quarto websites are designed to be device agnostic, so they should display well on different screen sizes, including phones.
Pay attention to the speed of your website. Users expect a fast and responsive experience. To ensure this:
Avoid using large image sizes (compress them if necessary).
Minimize dynamic content unless essential (static content reduces server load).
Keeping your site static can also simplify the deployment process.
Step 6: Deploy Your Website
Congratulations on creating your website! Now it’s time to deploy it.
Step 6.1: Choosing a Way to Deploy Your Site
Quarto’s publishing guide lists various methods to publish your website and describes their use cases. If you don’t have your own server, here are three popular, free ways to publish your website:
Quarto Pub: The easiest option, but you cannot use a custom domain. Your domain will look like
https://username.quarto.pub.GitHub Pages: Great if you manage your Quarto website code on GitHub. You can automate the publishing process using GitHub Actions.
Netlify: A professional tool that supports custom domains and handles hosting and security. The free plan is sufficient for a personal website.
In summary:
Use GitHub Pages if you already manage your code on GitHub.
Use Quarto Pub if you don’t need a custom domain.
Use Netlify if you want to use a custom domain.
If you have your own server, you can deploy the website files in the _site folder. I’ll show you how to deploy your website in a Docker container, with a custom domain and security measures in place. This approach requires more work but provides flexibility and control.
Step 6.2: Preparing Containerization
Step 0: Install Docker on Your Local System
You’ll create and test your website locally before deploying it to the server. You need Docker installed on both your local machine and your server. For your local machine, Docker Desktop is a convenient app. Follow Docker’s installation guide to install the app. There are options for Linux, Mac, and Windows. Docker Desktop includes a terminal for running the following commands. Alternatively, you can install Docker Engine in your own terminal. Head over to part I on how to do that in Linux or Windows (WSL).
Optionally, register an account on DockerHub. It’s a repository for Docker images, useful for pulling your website’s container to your server. We’ll use it in this guide, but you could also copy your Docker image directly to your server.
Step 1: Create A Dockerfile
In your website’s folder, create a new file named Dockerfile (without an extension). This file will contain instructions for Docker to containerize your website. Add the following content:
# Stage 1: Build
FROM debian:bullseye-slim AS builder
# Use ARG to specify the Quarto CLI version
ARG QUARTO_VERSION=1.7.31
# Set up the working directory where your site will be copied
WORKDIR /mysite
# Install necessary packages (wget, git, etc.) and clean up apt lists
RUN apt-get update && \
apt-get install -y --no-install-recommends wget ca-certificates git && \
rm -rf /var/lib/apt/lists/*
# Download and install Quarto CLI
RUN wget "https://github.com/quarto-dev/quarto-cli/releases/download/v${QUARTO_VERSION}/quarto-${QUARTO_VERSION}-linux-amd64.deb" -O quarto.deb && \
dpkg -i quarto.deb && \
rm quarto.deb
# (Optional) Remove now-unused packages to reduce image size
RUN apt-get purge -y --auto-remove wget && \
rm -rf /var/lib/apt/lists/*
# Install any Quarto extensions (for example, an icon extension)
RUN quarto add --no-prompt mcanouil/quarto-iconify
# Copy the entire project into the builder image so Quarto can see and render it
COPY . .
# Render the site with Quarto to the /tmp/site directory
RUN quarto render . --output-dir /tmp/site
# Stage 2: Serve using the lightweight nginx:alpine
FROM nginx:alpine
# Copy the rendered site from the builder to NGINX’s default HTML directory
COPY --from=builder /tmp/site /usr/share/nginx/html
# Adjust permissions if needed (e.g., for images)
RUN chmod -R 755 /usr/share/nginx/html
# Expose port 80 (the default HTTP port)
EXPOSE 80- 1
- Use the lightweight bullseye-slim as the base for the Docker container.
- 2
- Install Quarto using an argument (ARG) to specify the version. This allows you to specify the version in the Docker build command later without changing the Dockerfile.
- 3
- Make sure the Nginx server can read all files. If you don’t set the permissions explicitly, you may end up with missing images because Nginx doesn’t have the proper permissions to serve them.
Step 6.3: Containerize Your Website
Open a terminal. If you are using Docker Desktop, you can use the terminal within the app. Navigate to your website’s directory with cd.
Check the current Quarto CLI version here. There might be a newer version available than the default in the Dockerfile. Specify the desired version using –build-arg in the following command to build the container:
docker build --build-arg QUARTO_VERSION=1.7.31 -t username/private:website -t username/private:website-v1.0.0 .- 1
- Change the Quarto CLI version as needed. Replace “username” with your DockerHub username. The -t flag is used twice to tag the image, once as :latest for convenience and once with a version number to keep track of versions. I specified a specific repository called “private”, because I like to push all Docker images that have no public use into this repo. These images will not appear in searches and cannot be pulled without authentication. The free DockerHub plan only allows one repo to be set to private. If you do it this way, make sure the ‘private’ repo exists.
After building the image, run it locally for testing:
docker run -p 8000:80 -d username/private:website To view your containerized website, enter “localhost:8000” in your browser. The site should display as expected.
Troubleshooting
If you encounter issues during the build, check the error messages and search for solutions online. Often, it’s a minor issue such as a missing dependency or typo. Ensure you’re using only static content if you use the Dockerfile provided.
If the container doesn’t run properly, try ‘docker ps -a’ to list images or ‘docker logs -f name_of_container’ to view logs and identify errors.
Also have a look at the Quarto GitHub repository for guidance. Check the “Issues” and “Discussions” sections. Someone might have encountered a similar problem.
If the website looks as expected, push the container to your DockerHub repository.
docker push username/private:website
docker push username/private:website-v1.0.0- 1
- The image won’t be pushed twice. It just gets two tags, so we have the convenience of ‘latest’, but also a version number.
Step 6.4: Run Your Website Container On a Server
Now, pull the container image to your server. Open a terminal or server console and log in to your server. Create a new directory for your website container:
mkdir websiteMove to that directory:
cd websiteLog in to your Docker account:
docker loginCreate a Docker Compose file:
sudo nano docker-compose.ymlPopulate it like this:
services:
website:
image: username/private:website
restart: unless-stopped
expose:
- '80'
pull_policy: always
networks:
- npmnet
networks:
npmnet:
external: true- 1
- Name the service.
- 2
- Specify your image.
- 3
- Expose only the internal port to the Docker network.
- 4
- Make sure the latest image is pulled.
- 5
- Attach the service to an existing Docker network. Make sure your reverse proxy is on it as well.
- 6
- Specify that the network already exists.
Save (ctrl + s) and exit (ctrl + x). Now start the app:
docker compose up -dStep 6.5: Use Your Domain and Secure Your Website
Go to your domain registrar and add an A-record. You can use a subdomain such as “website.yourdomain.com” or the root domain (yourdomain.com) by entering “@” and your server’s IP address.
Open your Nginx Proxy Manager (or equivalent) and add a proxy host for your subdomain with destination ‘website’ (the service name you specified) and port 80. Add an SSL certificate, and enable security features.
For more detailed steps, refer to the server-basics post, which includes examples with Namescheap and Nginx Proxy Manager.
Visiting yourdomain.com should now display your website over HTTPS.
Step 7 (In the Future): Applying Changes to Your Website
At some point, you’ll likely want to update or add new content to your website. With the Docker deployment setup, this process involves a few steps but becomes straightforward with practice. Here’s what you need to do:
Make Changes Locally: Work on your website locally as usual.
Rebuild the Docker Image: Update the Docker image with your changes. Use the ‘docker build’ command from above. Ensure you update the Quarto CLI version if necessary.
Push the Updated Image to DockerHub: Use the ‘docker push’ commands. Don’t forget the change the version tag (e.g. v1.2.3). I change the major version (1) after a complete overhaul, or breaking changes, the minor version (2) if I add something such as a blog post, and the patch version (3) for smaller fixes (e.g. spelling, broken links).
Restart Your Container: Use ‘docker compose up -d’ to pull the latest image and restart your website container.
That’s it, thank you for following along!
Giving Back
There’s not much to do but thank Posit, specifically the Quarto developers, and spread the word about this wonderful free and open source software.