Changelog
2025/06/08: Hoarder rebranded to Karakeep, so I updated URLs etc.; improved Docker networking in the compose file; included a quick look.
Motivation
Browser bookmarks can get messy fast. For example, when browsing #rstats on Bluesky, I often come across great tutorials, packages, and discussions I want to save for later. But managing bookmarks manually — creating folders, assigning links, and searching later — can be tedious.
Apps like Mozilla’s Pocket or Nextcloud Bookmark can help, but they still require manual sorting. On top of that, issues like link rot (broken links) and extracting text or code from images can make bookmark management even more tedious.
That’s when I found Karakeep in the top self-hosted apps list on selfh.st. Its features instantly sold me. It’s everything you could want from a bookmark service:
Save links, store images and PDFs, and add simple notes
Use OCR to extract text from images
Organize with lists and automatic tagging via LLM
Auto-save links from RSS feeds
Archive full pages and download videos
Full text search for all content
[Planned:] Download content for offline reading
The interface is clean and user-friendly, too. Try out the demo!
📦 App Info
- Logo:
- Purpose: Bookmark everything (with a lot of features)
- Deployment: Docker Compose (preferred), also standalone binaries and other methods available
🔍 Tech & Usage
- Stack: TypeScript
- Memory: 750 MB in idle (all services together)
- Disk: ~700 MB
- CPU: 2 % of 4 vCPUs (idle)
📜 License & Community
- License: Open Source (AGPL-3.0)
- Pricing: Free
- Type: Community-driven
- User Base: Rather large
Installation
Prerequisites:
Server with Linux OS (e.g., Ubuntu 24.04) and Docker installed
A Domain
A reverse proxy for SSL and gateway management (e.g., Nginx Proxy Manager)
Firefox or Chrome browser (plugin only available for these)
The official installation guide for using Docker compose is straightforward (other approaches available). But seeing an applied example that works is always nice.
Step 1: Register a Subdomain
You can host Karakeep locally on your machine, but you probably want to use it on multiple devices. Visit your domain registrar and add an A-record (e.g., bookmarks.yourdomain.com). For help setting this up, refer to this guide.
Step 2: Create a New Directory
On your Linux server, create a directory for Karakeep:
mkdir karakeep
cd karakeep
Step 3: Download the Docker Compose File
wget https://raw.githubusercontent.com/karakeep-app/karakeep/main/docker/docker-compose.ymlThe compose file works out of the box, but in order to not expose ports to the host, we attach the Karakeep services to an existing Docker network. See the following ‘Understanding the Structure’ section for more information.
Understanding the Structure of Karakeep Through the .yml File
The content of the .yml file looks something like the following. I attached all services to an existing Docker network. My reverse proxy is also on that network. This way, no ports need to be exposed to the host.
services:
karakeep:
image: ghcr.io/karakeep-app/karakeep:${KARAKEEP_VERSION:-release}
restart: unless-stopped
volumes:
- data:/data
expose:
- 3000
env_file:
- .env
environment:
MEILI_ADDR: http://meilisearch:7700
BROWSER_WEB_URL: http://chrome:9222
# OPENAI_API_KEY: ...
DATA_DIR: /data
networks:
- npmnet
chrome:
image: gcr.io/zenika-hub/alpine-chrome:123
restart: unless-stopped
command:
- --no-sandbox
- --disable-gpu
- --disable-dev-shm-usage
- --remote-debugging-address=0.0.0.0
- --remote-debugging-port=9222
- --hide-scrollbars
networks:
- npmnet
meilisearch:
image: getmeili/meilisearch:v1.11.1
restart: unless-stopped
env_file:
- .env
environment:
MEILI_NO_ANALYTICS: "true"
volumes:
- meilisearch:/meili_data
networks:
- npmnet
volumes:
meilisearch:
data:
networks:
npmnet:
- external: true- 1
- I change the name from the generic ‘web’ to ‘karakeep’.
- 2
- I use ‘expose’ to only expose the internal port to an existing Docker network, not the host.
- 3
- Attach the web service to an existing Docker network (reverse proxy needs to be on it, too).
- 4
- Also attach this service to the existing network.
- 5
- Also attach this service to the existing network.
- 6
- Specify that the network already exists.
The file defines three services: web, chrome, and meilisearch.
The web service is the main Karakeep application. It runs on port 3000 and uses the data volume mounted at /data for persistent storage. This is where bookmarks and related metadata are stored. Configuration settings, such as the addresses of the chrome and meilisearch services, are loaded from a .env file.
The chrome service provides browser rendering capabilities by running an Alpine-based Chrome browser in headless mode. It is responsible for tasks such as generating link previews, fetching images, and extracting descriptions for bookmarks. The web service communicates with chrome over port 9222 using the Chrome DevTools Protocol. The debugging address is set to allow internal communication within the Docker network.
The meilisearch service acts as the search backend, enabling fast and efficient natural language queries. For example, users can search for bookmarks using phrases like “R programming tutorial about beautiful color palettes,” and Meilisearch will return relevant matches. It maintains its own data directory, stored in the meilisearch volume, where it creates optimized indexes for querying. The web service feeds bookmark data to Meilisearch over port 7700.
In summary, the web service manages bookmarks and user interactions, chrome enhances the functionality with automated rendering and preview generation, and meilisearch ensures that searches are fast and accurate.
Note: To change the default port (3000), you can update it to something like 3005:3000 in the .yml file. Ensure that the second number (3000) remains unchanged, as it represents the internal port used by the app.
Step 4: Configure Settings
You could make changes to the compose file to adjust settings, but these would be overwritten with updates. That is why using an .env file is recommended. Create one with:
sudo nano .envNow populate it. Here are the most notable settings as the time of writing. Have look at the annotations.
KARAKEEP_VERSION=release
NEXTAUTH_SECRET=super_random_string
NEXTAUTH_URL=http://booksmarks.yourdomain.com:3000
MEILI_ADDR=http://meilisearch:7700
MEILI_MASTER_KEY=another_random_string
OPENAI_API_KEY=your_api_key
INFERENCE_TEXT_MODEL=gpt-4o-mini
INFERENCE_IMAGE_MODEL=gpt-4o-mini
INFERENCE_CONTEXT_LENGTH=2048
INFERENCE_LANG=english
MAX_ASSET_SIZE_MB=50
DISABLE_SIGNUPS=false
OCR_LANGS=eng
CRAWLER_FULL_PAGE_SCREENSHOT=false
CRAWLER_FULL_PAGE_ARCHIVE=false
CRAWLER_NAVIGATE_TIMEOUT_SEC=60
CRAWLER_VIDEO_DOWNLOAD=false
CRAWLER_VIDEO_DOWNLOAD_MAX_SIZE=250- 1
- Pulls the latest stable version. Alternatively, specify a version (e.g., 0.10.0)
- 2
- Karakeep uses Nextauth for authenticated login. Enter a strong password here. You can generate one by running “openssl rand -base64 36”
- 3
- Your subdomain URL followed by Karakeep’s default port. If you use another port, don´t forget to use it here.
- 4
- Optionally, you can enable Meilisearch. It is a lightweight and open source search engine that allows you to smart search your booksmarks.
- 5
- Set the key for Meilisearch.
- 6
- Optionally, Karakeep uses LLMs for automatic tagging of saved resources. You can either use the OpenAI API, or a self-hosted Ollama model. See the documentation for how to set up Ollama. I use the OpenAI API, because I use a low powered VPS that does not have the resources to run LLMs itself smoothly.
- 7
- Use any OpenAI model you like. The GPT-4o-Mini model is capable of producing good bookmark tags, and doesn´t break the bank (~3000 requests per 1 $ US Dollar).
- 8
- Set the max. context length of a query. 2048 is probably enough for tagging. Setting this higher will consume more money or resources.
- 9
- Set the language of generated tags.
- 10
- Sets the max. size of uploaded resources. Default is 4 MB.
- 11
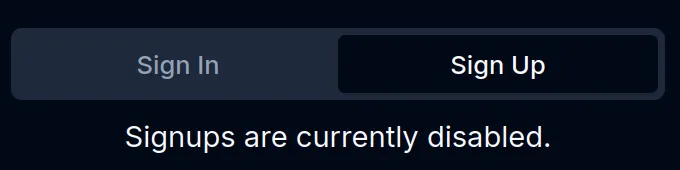
- Here you can enable or disable user signups for your instance. Keep this “false” for now, so you can sign up yourself.
- 12
- Set the language for tessaract (extracts text from images)
- 13
- If you have the disk space, you can enable to store a full screenshot of a given page.
- 14
- If you have the disk space, you can automatically archive pages.
- 15
- Give the crawler 60 seconds to navigate to a given page. Default is 30. I increased the amount in case of a bad connection.
- 16
- Automatic video downloads.
- 17
- Max. size of downloaded videos. This determines the quality of videos. Default is 50. -1 disables any limit.
Once configured, start your instance with:
docker compose up -dStep 5: Configure Nginx Proxy Manager
Open your Nginx Proxy Manager (NPM) interface and add a new proxy host for your subdomain. Use the web service name (‘karakeep’ in my example, ‘web’ is the default) along with port 3000. Enable websocket support, exploit protection, and SSL.
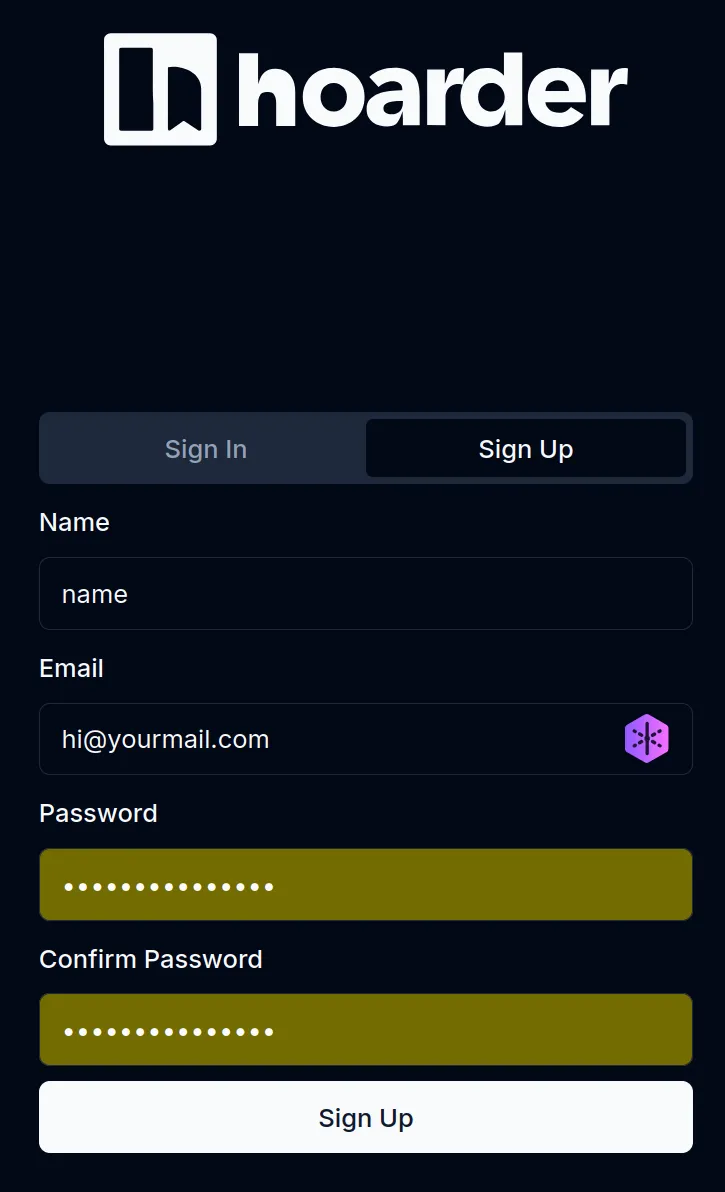
Step 6: Sign Up
Navigate to the subdomain you set up, and you should be greeted by Karakeep’s login interface (previously named Hoarder). Create an account to get started.
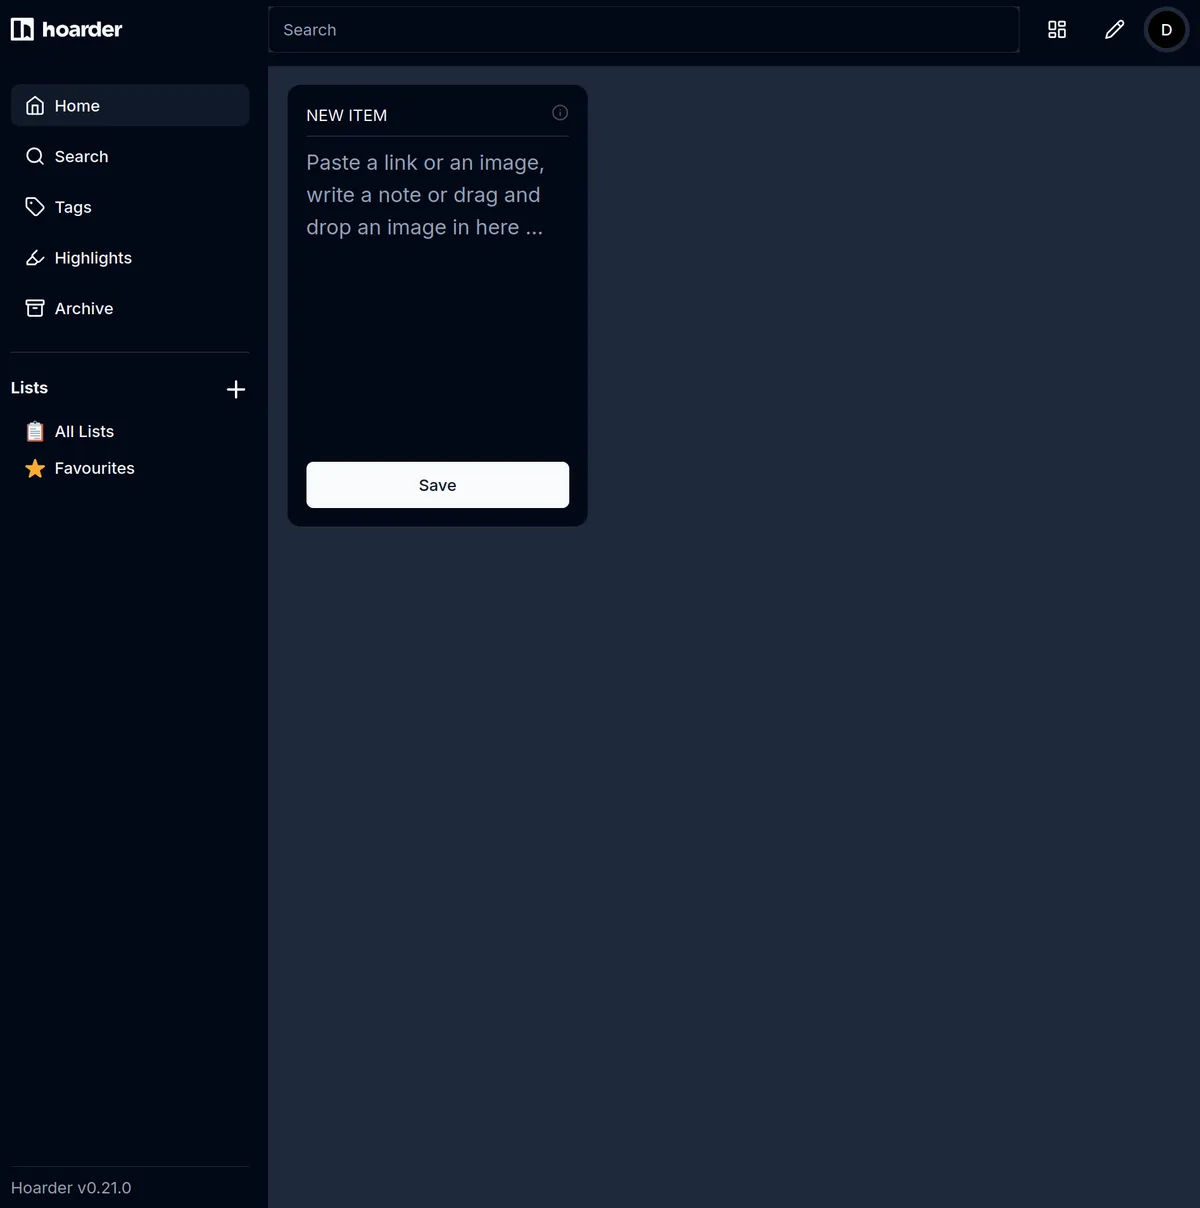
And voilà! You’re now inside your Karakeep instance. Before making any changes, I went back to the .env file and set DISABLE_SIGNUPS=true. Since I’m the only user for now, this step ensures that bots can’t create accounts. After updating the file, I ran docker compose up -d again to apply the changes.
To test everything, including the AI tagging feature using the OpenAI API, I added four R-related links I wanted to revisit later.
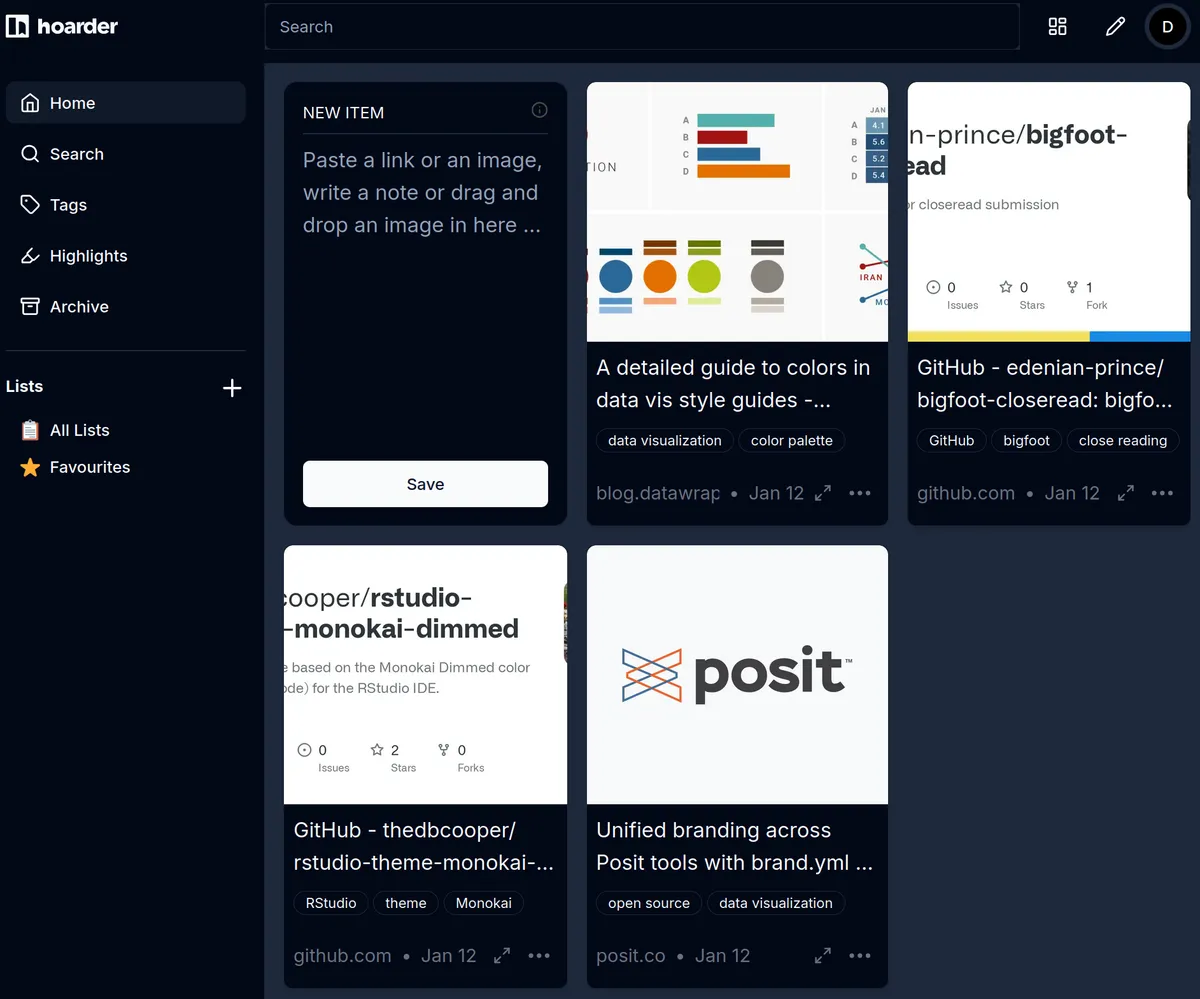
The Chrome scraper worked perfectly, fetching both preview images and descriptions for the links. And AI-generated tags were added automatically! These tags are generally accurate enough for efficient searching later. For example, when I added a Posit blog post about brand.yml (a tool for maintaining consistent branding across Quarto publications), the generated tags were relevant.
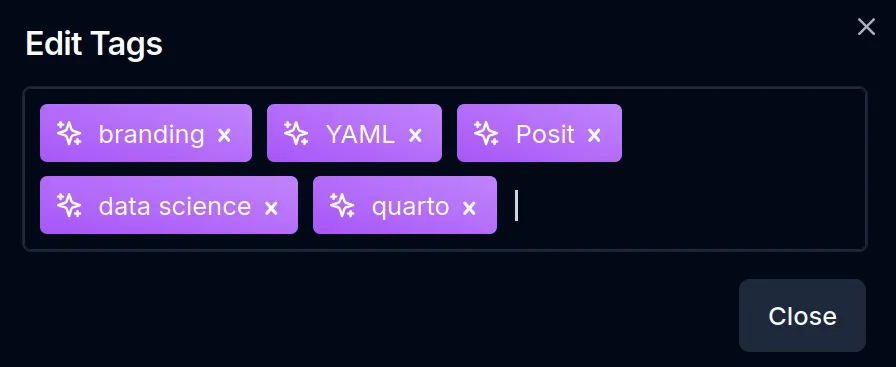
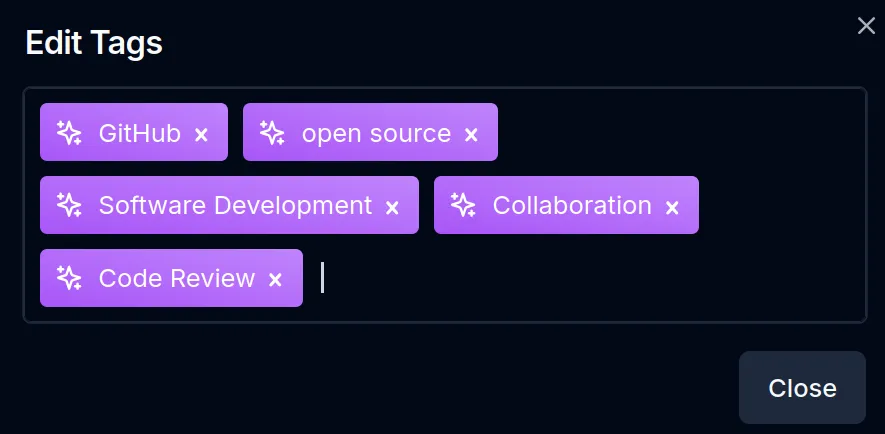
However, not all tags were spot on. A GitHub repository showcasing a Quarto close-read example generated overly generic tags. I simply added two more to improve it. The good news? The four API calls to OpenAI cost a fraction of a cent in total; an good trade-off for the time saved.
And that’s it! You can now access your Karakeep instance from your subdomain and start organizing your online discoveries with ease.
Step 7: Install Browser Plugin and Mobile App
To quickly save bookmarks into Karakeep, install the browser plugin and mobile app. Check the official documentation for installation links and setup instructions.
Giving Back
There is no doubt that Karakeep will save you time and lead to a better online experience. If you want to motivate the devs around creator Mohamed Bassem to keep working on the project, or just say thanks, you can sponsor the project on GitHub or buy Mohamed a coffee. Karakeep is an open source project, so engaging with it in discussions, report bugs, suggesting features, and contributing code is also a great way to keep it thriving.