Changelog
2025/06/08: Included a quick look; updated the Docker Compose file to include better Docker networking and integration with a reverse proxy (NPM).
In Part I, we setup a VPS, using Ubuntu, Docker, Nginx Proxy Manager, and finally installed OpenProject to manage our projects and tasks efficiently. In this post, we are going to install Nextcloud to facilitate further key aspects of academic work: File management and online collaboration. This post assumes you have completed steps 1-4 of part I.
What Is Nextcloud and What Do I Get From Using It?
Nextcloud is an open-source file sharing and collaboration platform. To use it for free, you have to self-host it. Otherwise, you can use providers that host it for you. Key features for academics are the file synchronization, real-time collaborative document editing, calender, and video-call capabilities. Due to an active community developing add-ons, like meeting polls, there are lots of functions you can implement. Here are some highlights of the benefits of using Nextcloud:
Data Privacy and Control: Since Nextcloud can be self-hosted, users have complete control over where and how their data is stored.
Customization and Flexibility: Nextcloud can be customized to meet specific needs. Academics can add or develop extensions tailored to their research or administrative requirements, something not typically available in standard cloud services.
All-in-one-place: Given the capabilities, and level of customization available, you can do a lot in Nextcloud. You don’t need to have several apps or services like Google docs for collaborative editing, Dropbox for file sharing, Zoom for video-calls, and Doodle for scheduling meetings. You can do all that with your Nextcloud instance.
Integration Options: If you followed part I to the end and have a running OpenProject instance, you can connect OpenProject to Nextcloud. This way, you can attach your Nextcloud files directly to e.g. tasks in OpenProject. There are lots of other apps you can connect.
Lower Costs: Finally, there are no limits to the functionality except for the server you are running it on. Upgrading performance or storage of your server is usually much cheaper then multiple subscription fees for other services.
📦 App Info
- Logo:
- Purpose: A self-hosted productivity platform for file syncing, collaboration, calendar, contacts, and more
- Deployment: Docker Compose, Snap, Web Installer, or Manual (LAMP stack)
🔍 Tech & Usage
- Stack: PHP, JavaScript, MySQL/PostgreSQL, Redis
- Memory: ~1.5 GB in idle for a standard setup, depends on enabled apps
- Disk: ~500 MB base + storage for user files
- CPU: ~4% of 4 vCPUs (idle, scales with users and features enabled)
📜 License & Community
- License: Open Source (AGPLv3)
- Pricing: Free (Community Edition); Paid options for hosting/support
- Type: Community-driven, with commercial backing (Nextcloud GmbH)
- User Base: Large and growing (400k+ GitHub stars across repos, millions of users)
Sounds good? Then let’s get started!
Step 1: Install Nextcloud
Step 1.1: Register Your New Subdomain
Visit your domain registrar and set an A-record for nextcloud.yourdomain.com (or whatever subdomain you prefer). Refer to Part I, Step 3.2 for a refresher on A-records. Use the same settings as before. While your new subdomain is being registered, we can get on with installing Nextcloud.
Step 1.2: Install Nextcloud
Connect to your server using your terminal or your provider’s interface. If you have set up SSH keys in Part I, you can type the following in your local machine’s terminal:
ssh user@your_server_ip- 1
- Replace “user” with the user you created in part I. If you didn’t create one, you can also use “root”. Replace “your_server_ip” with the IP address of your server.
If you haven’t already done so, go to your home directory (use “cd ~”). Create a new folder there to store all files related to Nextcloud. Move into the directory you have created.
mkdir nextcloud- 1
- Creates a directory called “nextcloud”. Choose whatever name you like.
cd nextcloud- 1
- Moves to that directory.
Create a docker-compose.yml file.
nano docker-compose.yml- 1
- This will be our maestro file, composing our Nextcloud instance the way we want it.
We will make use of the official installation method, the Nextcloud All-in-One (AIO) docker container.
Add the following code to the newly created .yml file. Make sure you get the indentation right. Look at the comments to see what you need to change.
services:
nextcloud-aio-mastercontainer:
image: nextcloud/all-in-one:latest
init: true
restart: always
container_name: nextcloud-aio-mastercontainer
volumes:
- nextcloud_aio_mastercontainer:/mnt/docker-aio-config
- /var/run/docker.sock:/var/run/docker.sock:ro
networks:
- npmnet
environment:
- APACHE_PORT=11000
- APACHE_IP_BINDING=127.0.0.1
- APACHE_ADDITIONAL_NETWORK=npmnet
volumes:
nextcloud_aio_mastercontainer:
name: nextcloud_aio_mastercontainer
networks:
npmnet:
external: true- 1
- Attach the mastercontainer to an existing Docker network that your reverse proxy is on, too.
- 2
- Leave it as it is if you are running your Nextcloud behind a reverse proxy such as Nginx Proxy Manager, as this tutorial suggests. If not, you probably need to delete this line.
- 3
- This is an important addition that connects the Apache container (which the AIO setup will run) with the specified Docker networks. Without it, you will probably get 502 errors, as the AIO and Apache containers are not on the same network.
- 4
- Specify that the Docker network already exists. Make sure it does, and that your reverse proxy (NPM) is on it.
Wondering what the code means?
Services Section
nextcloud-aio-mastercontainer
image: nextcloud/all-in-one: This specifies the Docker image to use. In this case, it is the latest version of the Nextcloud All-in-One image.
init: true: This makes sure that an init system (like tini) is used to handle process management inside the container.
restart: always: This ensures that the container always restarts if it stops or if the Docker daemon is restarted. This is good for ensuring the service is always running.
container_name: nextcloud-aio-mastercontainer: This gives a specific name to the container, making it easier to manage.
volumes
nextcloud_aio_mastercontainer:/mnt/docker-aio-config: This creates a named volume (nextcloud_aio_mastercontainer) and mounts it inside the container at /mnt/docker-aio-config. This is used for storing configuration data persistently.
/var/run/docker.sock:/var/run/docker.sock: This mounts the Docker socket into the container as read-only (
ro). This allows the container to communicate with the Docker daemon, which is necessary for managing other containers.
environment
APACHE_PORT=11000: This sets an environment variable inside the container, specifying the port on which the Apache server (part of Nextcloud) will listen.
APACHE_IP_BINDING=127.0.0.1: This sets another environment variable, specifying that Apache should only accept connections from the local machine (localhost). We set this because we want Nginx Proxy Manager to handle incoming requests from the web (request -> NPM -> Nextcloud, instead of request -> Nextcloud). We would have to delete this line if we were not using some kind of reverse proxy. Otherwise, Nextcloud would not be reachable from outside the server (e.g. from your browser).
Volumes Section
- nextcloud_aio_mastercontainer: This defines a named volume with the name
nextcloud_aio_mastercontainer. Named volumes are used to persist data, even if the container is removed or updated.
Compose your Nextcloud containers:
docker-compose up -d- 1
- The -d flag indicates that we want to run the container in the background. The terminal is “detached” from the output of the container, so we can use it for other commands while the container is running in the background.
Step 1.3: Configure Proxy and Test
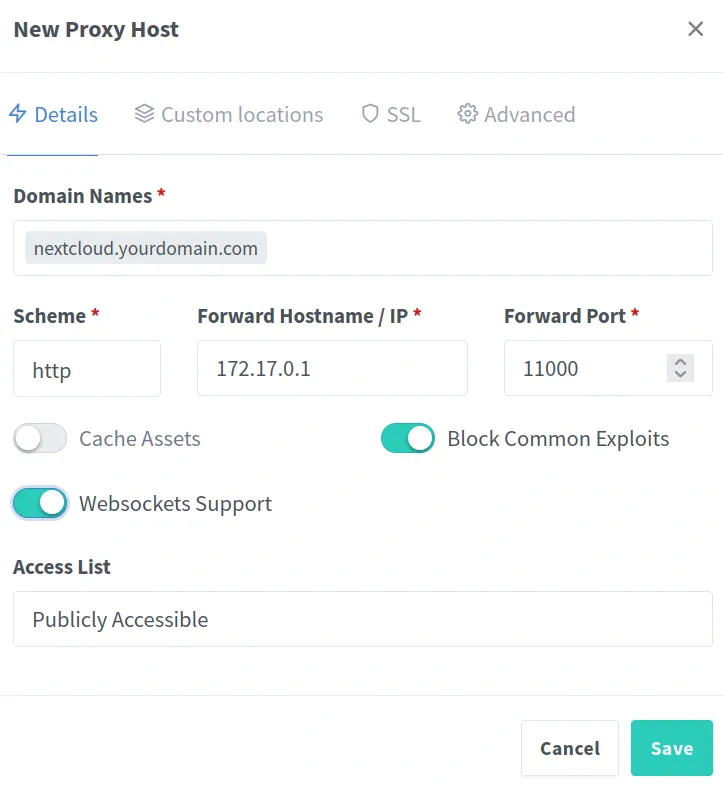
Next, go to your Nginx Proxy Manager admin page. If you followed part I, it might be manage-proxy.yourdomain.com. Add a host record for nextcloud.yourdomain.com, with the forward hostname ‘nextcloud-aio-apache’, and port 11000. Enable Block Common Exploits and Websockets Support.
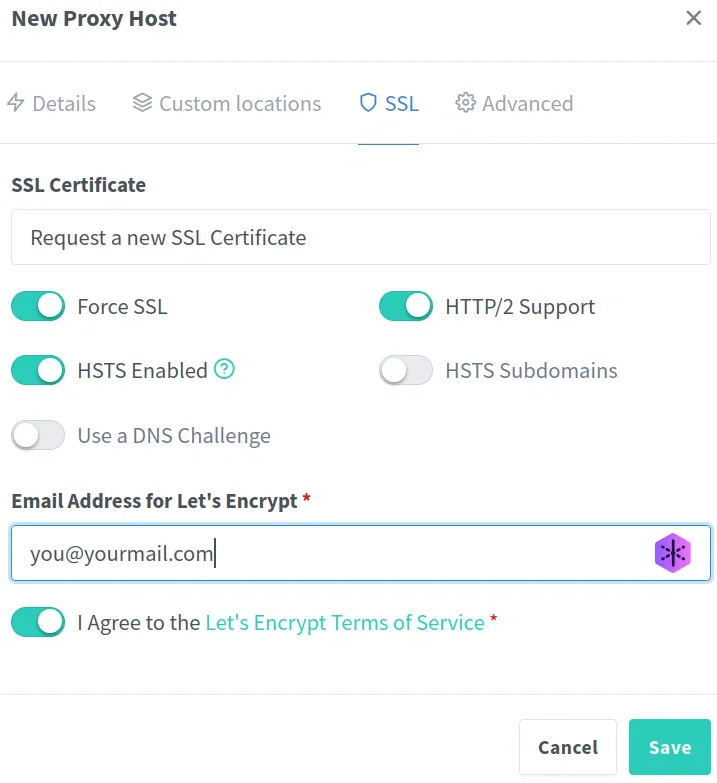
Move the the SSL tab and request a new certificate. Enable Force SSL, HTTP/2 Support, and HSTS. Enter your email address and agree to the terms and conditions.
Next, go to the Advanced tab, and paste the following into the text box:
client_body_buffer_size 512k;
proxy_read_timeout 86400s;
client_max_body_size 0;
These settings are optional, but have been recommended on GitHub. Setting proxy_read_timeout to 86400s (24 hours) specifies the maximum amount of time for an operation, such as a file upload. This will allow enough time for even large files to be uploaded at slow upload speeds. Setting client_max_body_size to 0 specifies that there is no limit to the size of files that Nextcloud will handle. You can set user limits in Nextcloud itself, so it makes sense not to set any limits here. Hit save. Don’t try to the reach your instance with your subdomain, yet.
Step 1.4: Set Up Your Nextcloud Instance
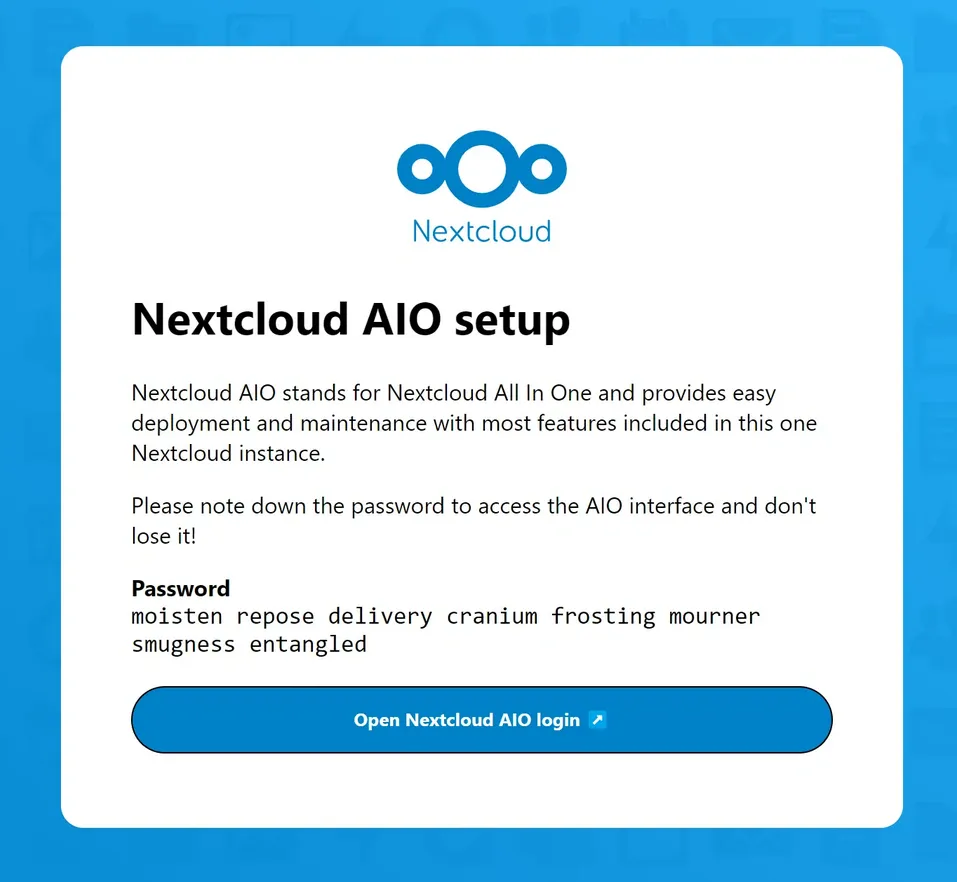
Use your new subdomain to access the setup page of your Nextcloud instance. You will see the Nextcloud AIO setup page. Important: Copy the password provided on the setup page. Once you have copied it, click the login button.
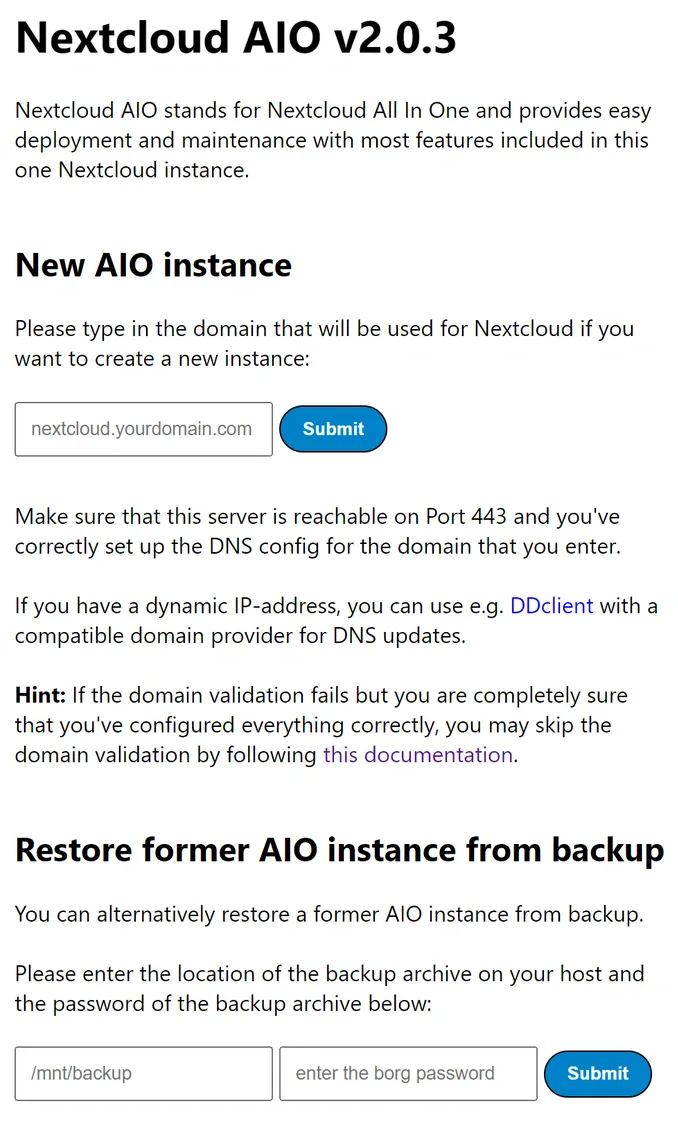
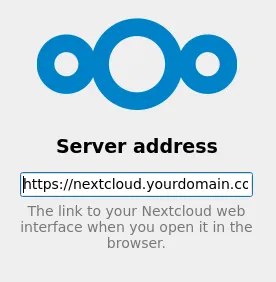
A login window appears. Enter the password. In the next window, enter your subdomain (e.g. nextcloud.yourdomain.com) and continue.
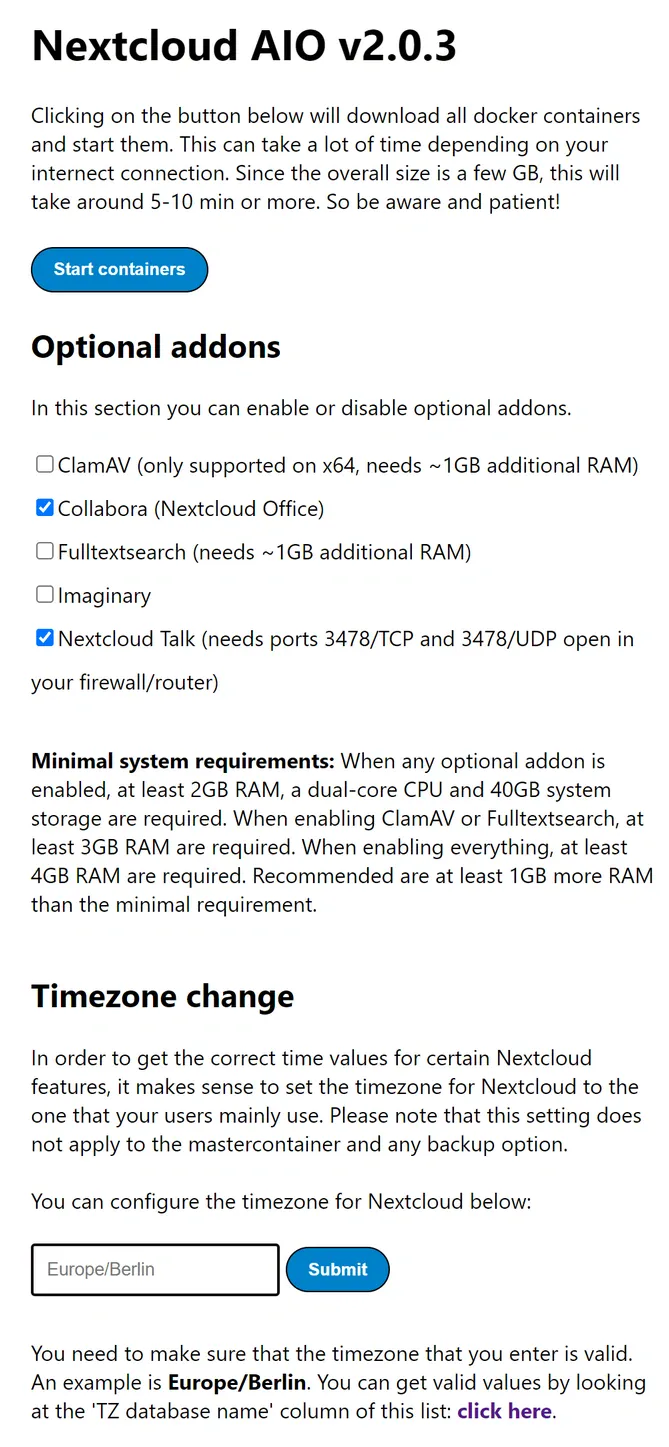
In the next window you can choose some addons. I just chose the defaults. Be sure to select Collabora for file editing and Talk for video conferencing. If you’re on the weakest VPS like me, I wouldn’t add all the add-ons for performance reasons. Make sure you enter the correct timezone, then start the containers.
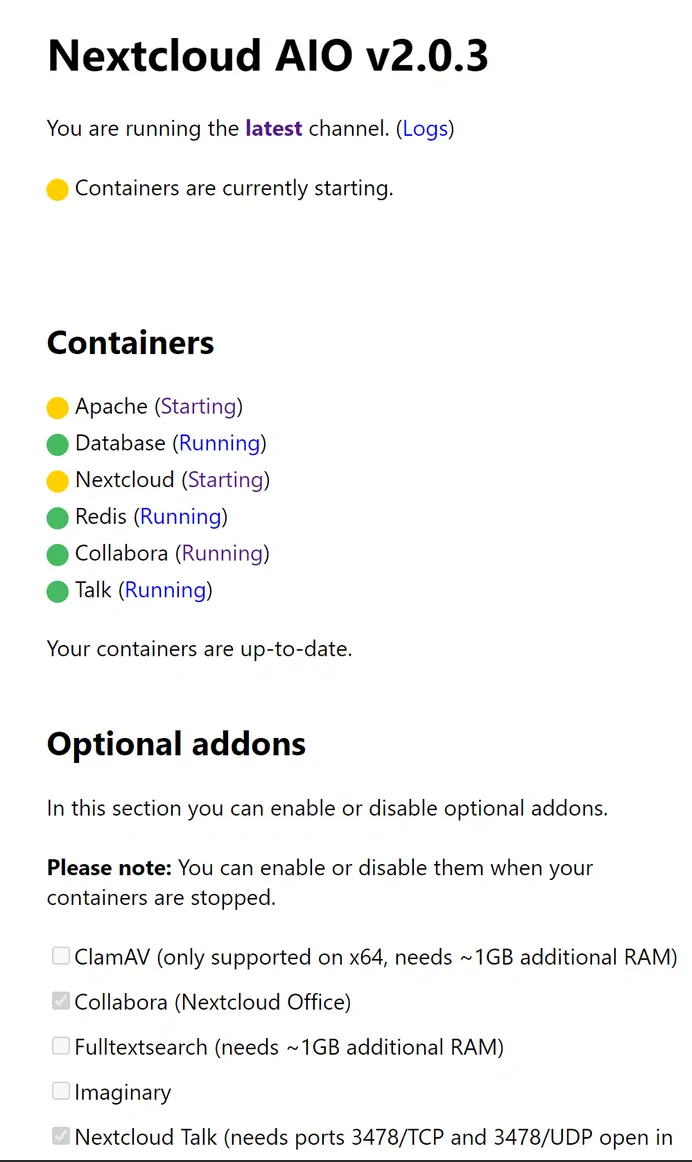
Next, you will see a page with build progress indicators. Wait until all the containers are green (running). This will take about 5-10 minutes. If you want, you can click on the status of any container to see the log.
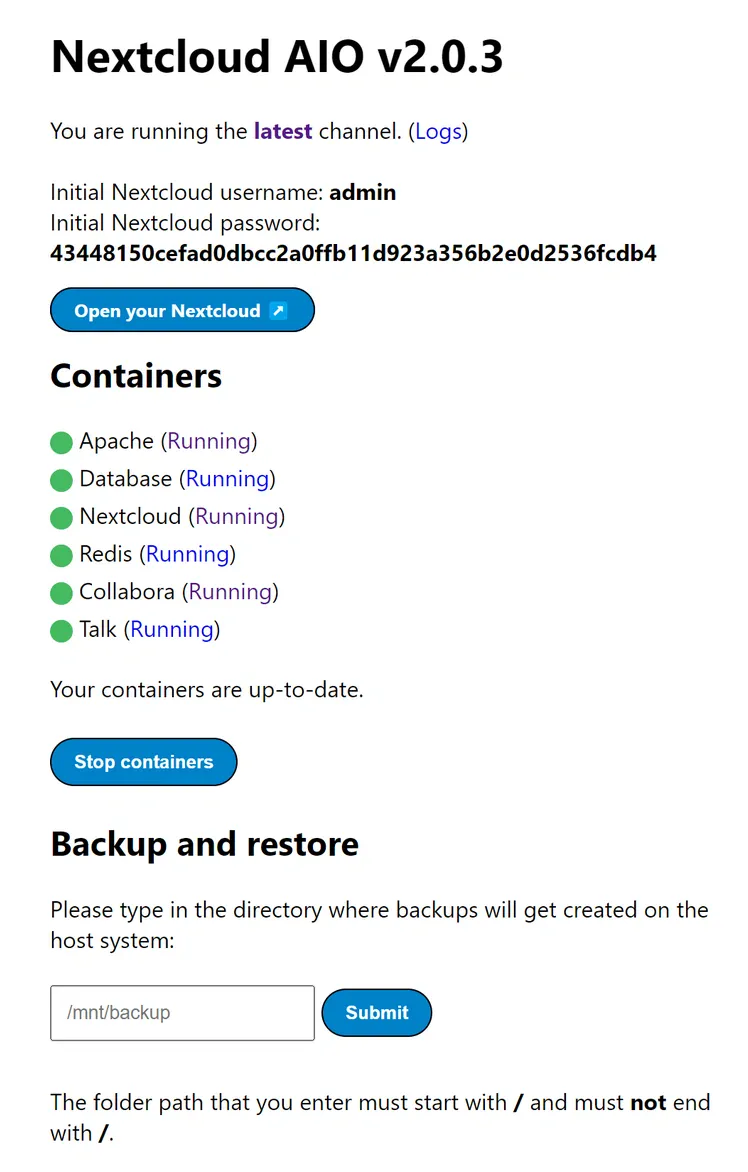
When the process is complete, you will be provided with login credentials, and the option to set up a backup location (which I did not use because the space on my VPS is only 40 GB). Use the credentials to log into your fresh Nextcloud instance!
If you need more details, you can find the official setup guide here.
Troubleshooting
You can find more options and explanations concerning your docker-compose.yml file here.
General advice and a FAQ can be found here.
If you can’t access the AIO setup page over you subdomain, you might need to temporarily adjust the compose file: remove the docker network entries, and expose ports directly via 8080:8080. Set your reverse proxy to ‘host’ mode. Try now to reach the setup page via ‘your-server-ip’:8080. Complete the setup. Then change the compose file back, and set your reverse proxy in the regular bridge mode again. It’s not very convenient, but Nextcloud is a sophisticated stack that needs Docker socket access, so providing roam-free access temporarily can help.
If you’re stuck and want to start fresh, you can reset your Nextcloud instance. If something went wrong before you could reach the AIO interface, try to figure out what is wrong by looking in the logs (docker logs <containername> -f), and carefully checking the NPM settings. Also try “docker compose down”, and then rebuild the containers with “docker compose up -d”, especially after changing something in the docker-compose.yml file.
Step 1.5: Install and Configure Nextcloud Desktop (Optional)
You can install Nextcloud Desktop on your local machine to automatically synchronize files with your Nextcloud instance in folders you specify. That’s quite useful. For example, when you work on a presentation and click save, the updated file is automatically backed up to your cloud. And when a colleague edits it in the cloud, the updated file is automatically downloaded to your system.
If you want that, here is what you do:
Get Nextcloud Desktop from the official download page. There are options for Windows, Mac, and Linux.
Install it.
Start the app. You will be prompted to link your Desktop App with the URL of your instance. A browser window will pop up asking you to log in for verification.
- Next, choose what should be synced and where in the Desktop app. That’s it.
Step 2: Explore and Customize Your Nextcloud Instance
You have your own Nextcloud! Log in and click around. In the top right corner you will find a panel where you can change the look, go to the settings or install applications. Here are some pointers on how to get started.
2.1 Installing an Office Suite
Choosing an Office Suite: You will probably need an office suite that enables collaborative editing. You can choose between Nextcloud Office (Collabora) and OnlyOffice. Nextcloud Office should be already installed.
Nextcloud Office: NO is a recent app developed by Nextcloud themselves. It is a version of Collabora that is optimized for Nextcloud. Collabora in turn uses LibreOffice.
OnlyOffice: The focus of OnlyOffice is the look of and compatibility with Microsoft Office documents. Although Nextcloud Office does also supports MS Office files such as .docx, you may get a closer experience and better compatibility with OnlyOffice.
Installation: You can (de)install either from the Nextcloud App Store. You can also get both, but this will use up your VPS resources and may get confusing.
2.2 Setting Up Video Calls (Nextcloud Talk)
Install Nextcloud Talk: This should also be installed out of the box. However, you need to make sure that port 3478 is open on your server. Use
sudo ufw allow 3478in your server console. This port is used by the TURN (Traversal Using Relays around NAT) server inside the Talk docker container. The TURN server ensures that people using a computer behind a restrictive firewall (think work environment) can join the video conference by relaying the media stream instead of using a direct (P2P) connection that might be blocked.Configuration: You should see it in the top toolbar. Go ahead and explore! Test the functionality with a friend to get used to it. You will notice cool things like the automatic recording of each participant’s speaking time.
2.3 Explore the Store for More Useful Apps
Keep Your Server Resources in Mind: There are lots of apps you can install. But each one uses a little more of your server’s resources. So only install what you really need, and disable the ones you don’t use.
Examples For Potentially Useful Apps:
Notes: I use the Notes app to quickly jot down ideas or small tasks that I don’t want to enter into OpenProject. There is a Nextcloud Notes app for smartphones, so you can take notes on the go.
Polls: The Polls app allows you to create polls, for example to schedule a meeting. For surveys there is the form app.
Forms: An app for simple questionnaires.
Tasks: Organize your tasks, sync them to your devices and calendar.
OpenProject: Combine the project management power of OpenProject with the file management power of Nextcloud. Get started with the official OpenProject guide.
2.4 Configuring File Sync
Desktop and Mobile Clients: Install the Nextcloud clients on your devices. See above for how to do install the desktop client. Mobile apps are also available.
Sync Folders: Choose which folders you want to sync from your devices to Nextcloud and vice versa. For example, in the desktop client, click on your user and go to settings. There you can add folders on your system that you want to sync. Remember that your server’s storage capacity is probably quite limited. So only sync files that are important for collaboration. If you need more storage, you can upgrade your server rental plan or use the “External storage support” app to point your Nextcloud to external storage such as a Network Attached Storage (NAS).
2.5 Additional Customization and Security Settings
Appearance and Accessibility: There is a menu of the same name, where you can change the theme of your Nextcloud, change the background, and configure keyboard shortcuts.
Personal Settings: Here you can add your personal information if you wish. There is also a useful indicator of how much space your files are using.
Add Users: You can share files, polls and video calls with anyone via links (they enter as guests). Consider creating user accounts for people you collaborate with frequently, such as co-authors. You can set permissions and manage access for all users.
Security Settings: In the Administration Settings menu, you will see tips to enhance your secrurity settings. The security settings in the Nginx Proxy Manager should already take care of critical security issues. Nextcloud also offers a nice feature to check the security status of your Nextcloud instance. Just enter the URL of your Nextcloud instance and check what could be improved. Your rating should always be “A” or “A+”.
Step 3 (Sometime in the Future): Upgrading Nextcloud
Fortunately, you can upgrade your installed applications with a simple click from your Nextcloud menu. Upgrading the Docker containers themselves isn’t much more difficult.
Backup Your Data: Before proceeding with the upgrade, it’s important to back up your Nextcloud data. Make sure you have everything backed up in case the worst happens and your current installation bricks. Either have a full backup of your Nextcloud ready, or a recent server snapshot that you can easily revert to.
Go to the Nextcloud AIO interface: Go to
https://nextcloud.yourdomain.com/settings/admin/overview(you’ll need to be logged in as a user in the admin group). From there, you can go to the AIO page again and upgrade containers. You will get upgrade notifications (apps and containers) in your Nextcloud instance.
That’s it, thank you for following along!
Giving Back
How awesome is Nextcloud? And all that FOR FREE. Visit the contribution page to find out how you can give back.